 English
 Italiano
 Português
 Deutsch
 Eesti
EestiWHAT IS ZOOM?
- Zoom main features
HOW DOES ZOOM WORK?
- Download and install Zoom
- Joining a Zoom meeting
- Schedule a Zoom meeting
- Hosting a Zoom meeting
- I - Zoom Toolbar
- II – Participants list
- III – Chat box
- IV – Host Screen
- V – Participant screen
- Reports
WHAT IS ZOOM?
Zoom is a cloud-based video teleconferencing platform created as a solution for online meetings (either by video or audio-only or both). This service allows group video conferences, live chats, screen sharing and session recording, among other features.
Zoom main features
Zoom has several pricing plans, including a free version. However, this version has limitations, namely a 40 minutes limit for each meeting. We reccommend that you access this platform using single-sign.
Single-sign on allows you to login to Zoom using your institutional credentials. This will connect you via your organization account.
HOW DOES ZOOM WORK?
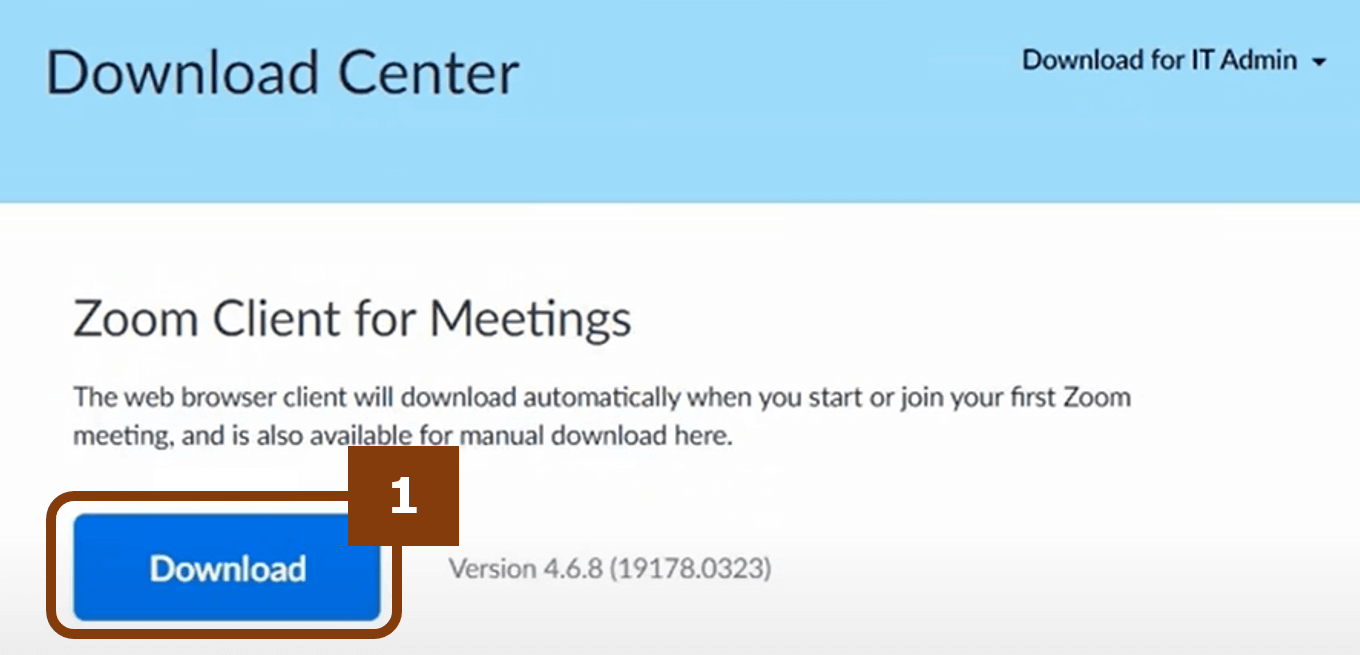
Download and install Zoom
To download and install Zoom on your desktop go to https://zoom.us/download to access the Download Center and click on “Download” (1).
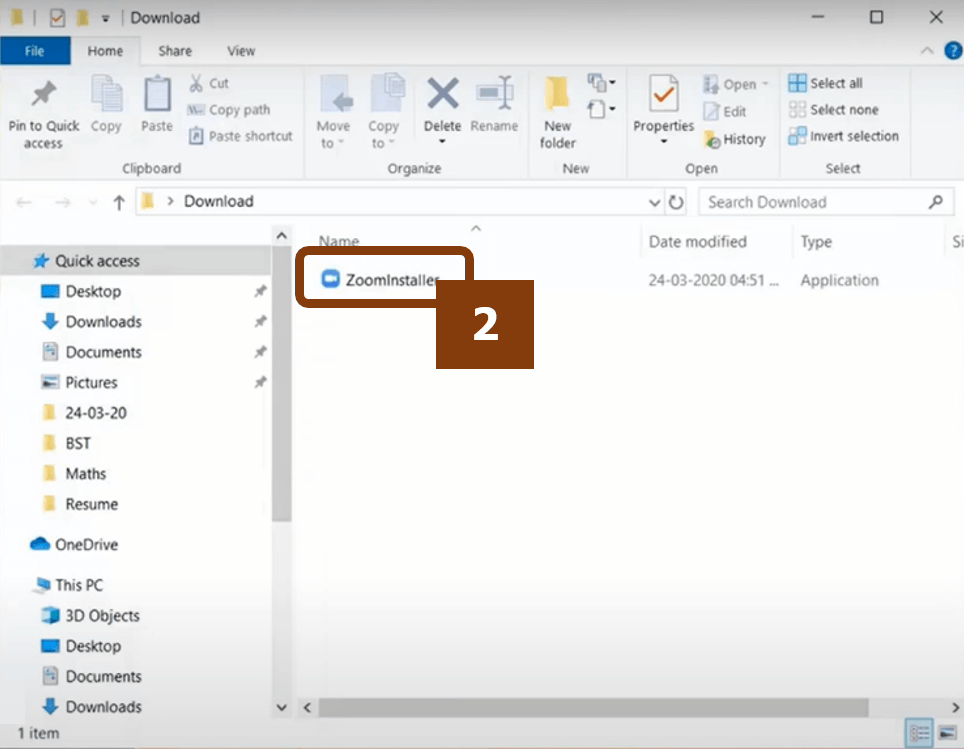
Save the downloaded file (2) on a safe location and double-click on it to launch the installer.
This will install the zoom app on your computer.
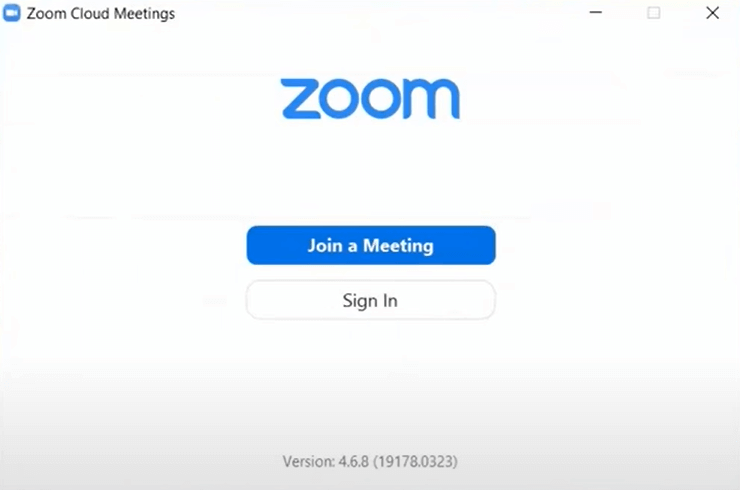
In the Dowload Center you can also find the links to install Zoom in your mobile devices or a plug-in to install a button on the Microsoft Outlook toolbar to let you start or schedule a meeting with one click.
Joining a Zoom meeting
There are three ways for you to join a Zoom meeting:
Using the Meeting ID:
1. Open Zoom and in the home page click on “Join”. 2. Enter the Meeting ID and click “Join”. 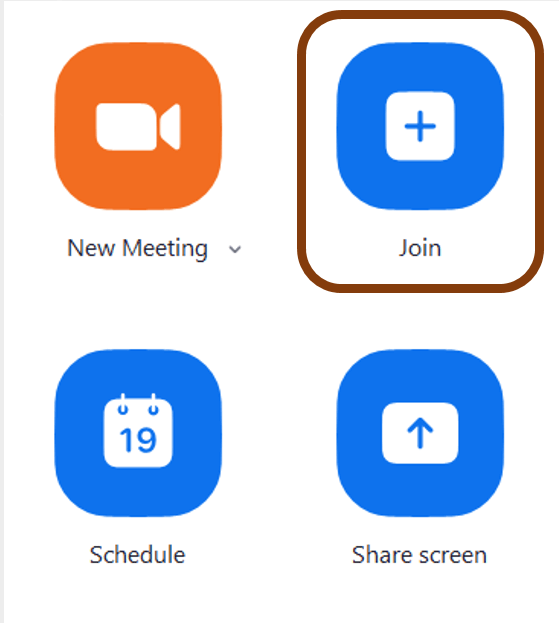
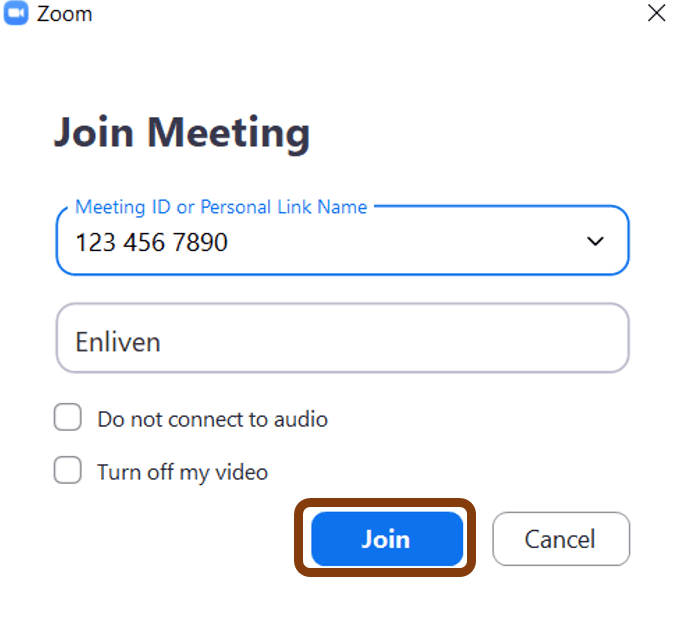
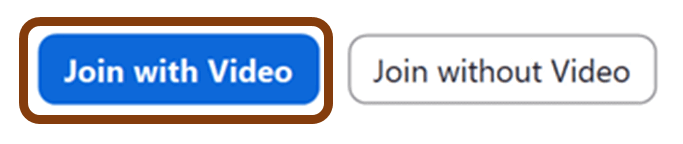
3. If the meeting is password protected, enter the password, and click “Join Meeting”. 4. If you want to join the meeting with your video already on, click “join with video”. 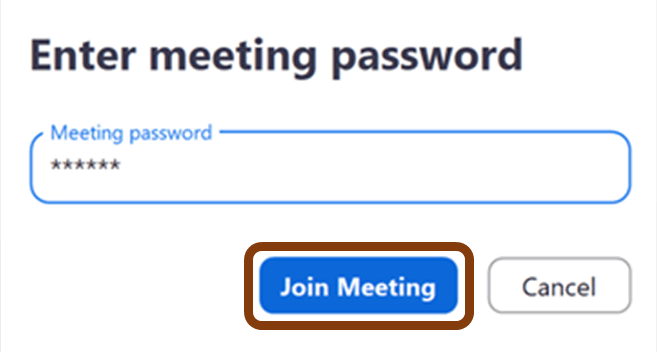
5. As you enter the meeting, you may be placed in the Waiting Room, until the host allows you to join.
Using an invitation link:
To join a Zoom meeting, you might receive invitation link. When you click a Zoom link, select “Open Zoom Meetings”. Please note that Zoom will ask for permission to use your camera and microphone.
Using a web browser:
-
Go to zoom.us/join, enter the Meeting ID and click “Join”.
-
Select “Open Zoom Meetings”. Click “Cancel” on the appearing box, otherwise you will go to the Zoom app, instead of the browser.
-
Click join from your browser.
-
Again, if the meeting is password protected, enter the password, and click “Join Meeting”.
-
When the meeting ends, you can leave by clicking “Leave Meeting” in the bottom-right corner.

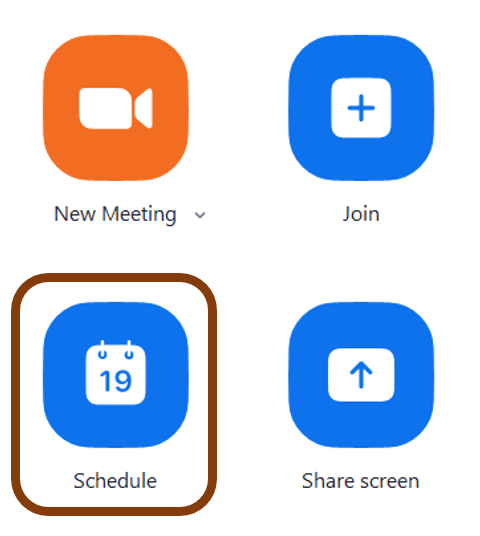
Schedule a Zoom meeting
Open Zoom and in the home page click on “Schedule”.
A window will appear, where you can enter your meeting options.
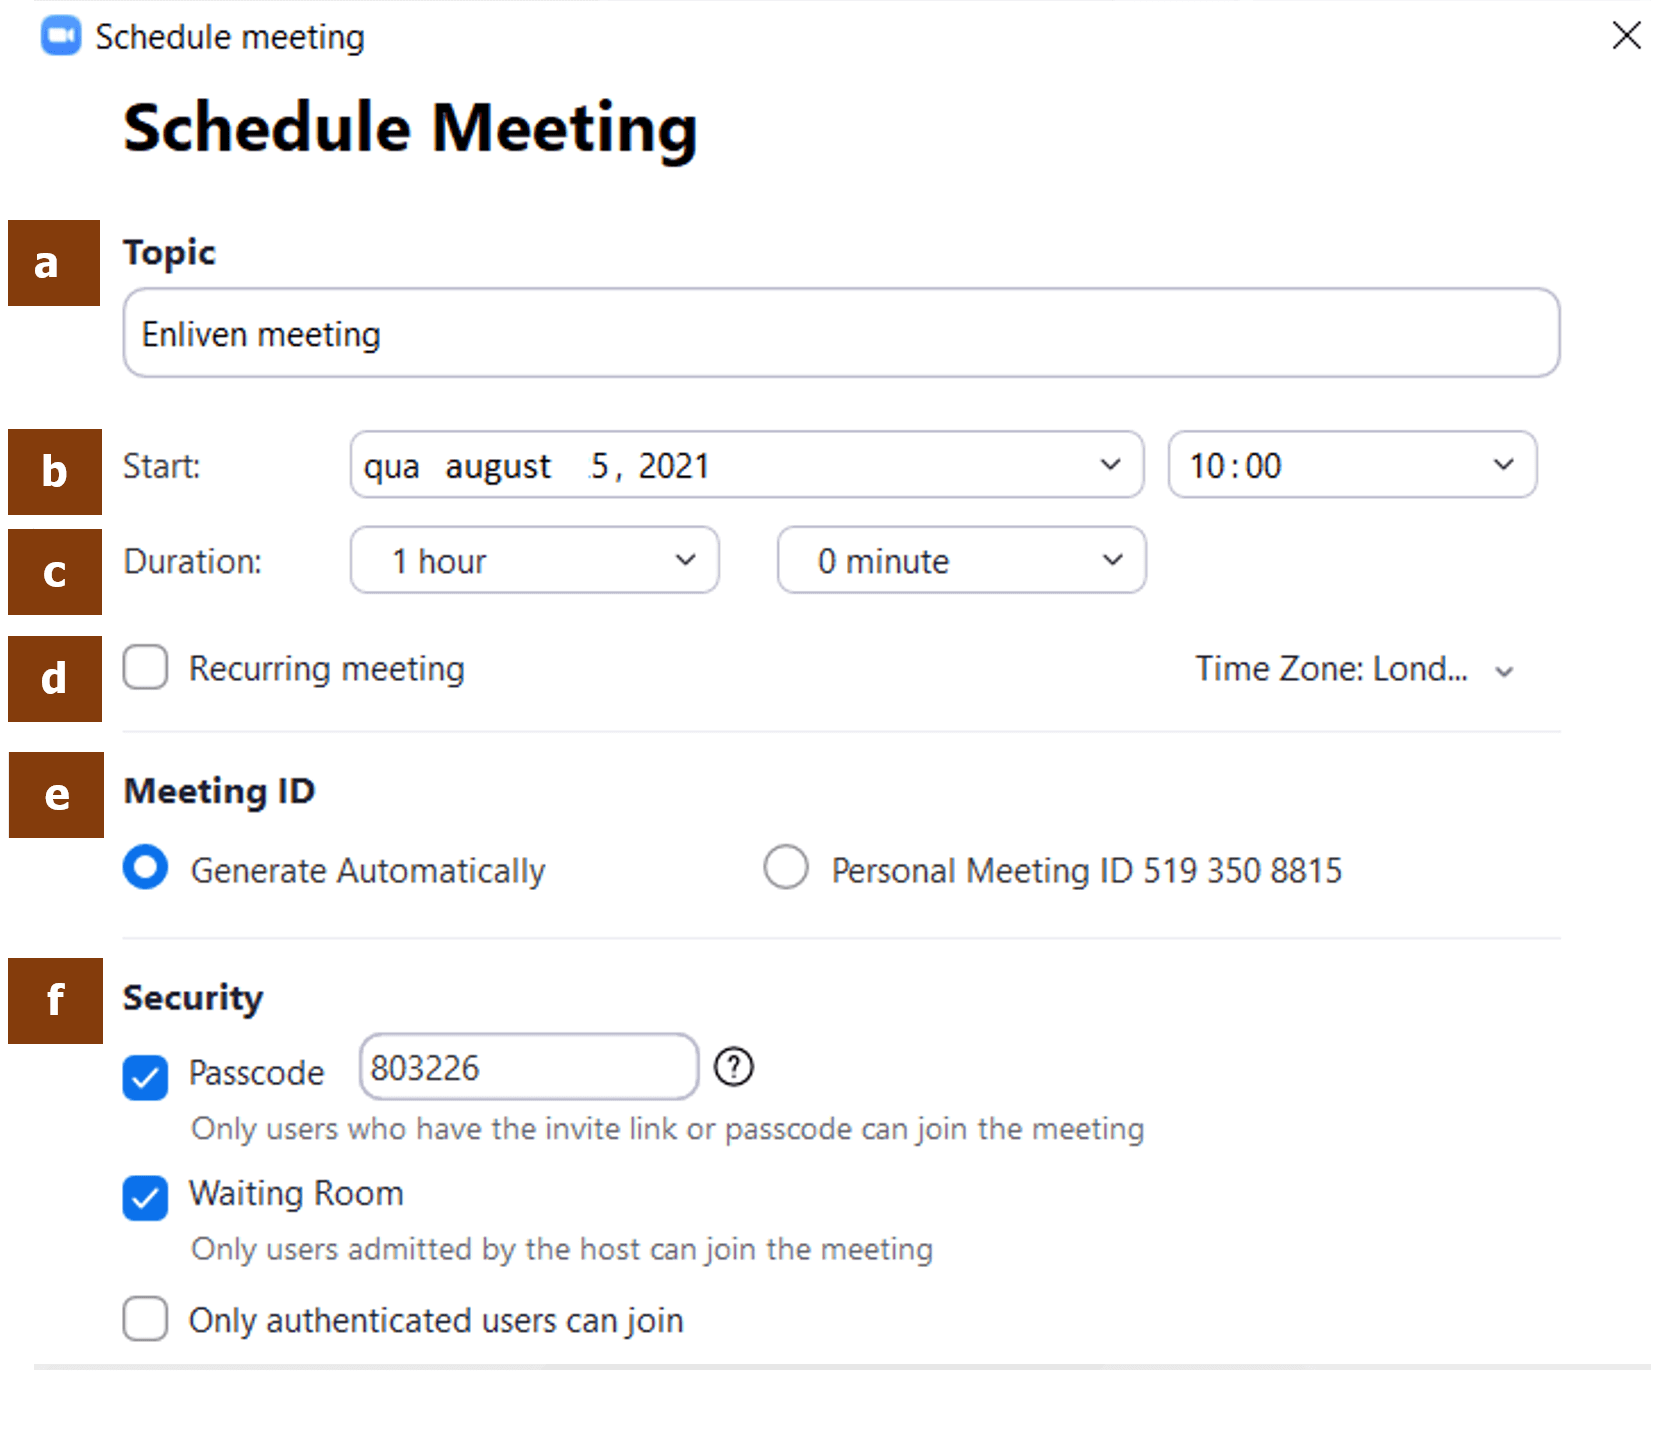
Topic – Give a short description to your meeting.
Date - Enter the date and time information. Please, check the time zone of your meeting.
Duration – Specify the planned duration for your meeting.
Recurring meeting – Check this option if your meeting is occuring regularly (e.g., weekly).
Meeting ID - Select “Generate Automatically”. The Personal Meeting ID refers to a virtual room assigned for your personal use, to which anyone with the link can join at any time, all the time. This last option is not reccommended for scheduling meetings.
Security – To better control the attendance of your meeting, you can add:
- a passcode: the meeting link will encrypt the passcode. Participants with the link won’t actually have to enter the passcode, but participants without it will be asked for a passcode in order to join your meeting;
- a waiting room: this option allows you to admit the meeting participants only when you are ready;
- registration – only authenticaded participants can join your meeting.
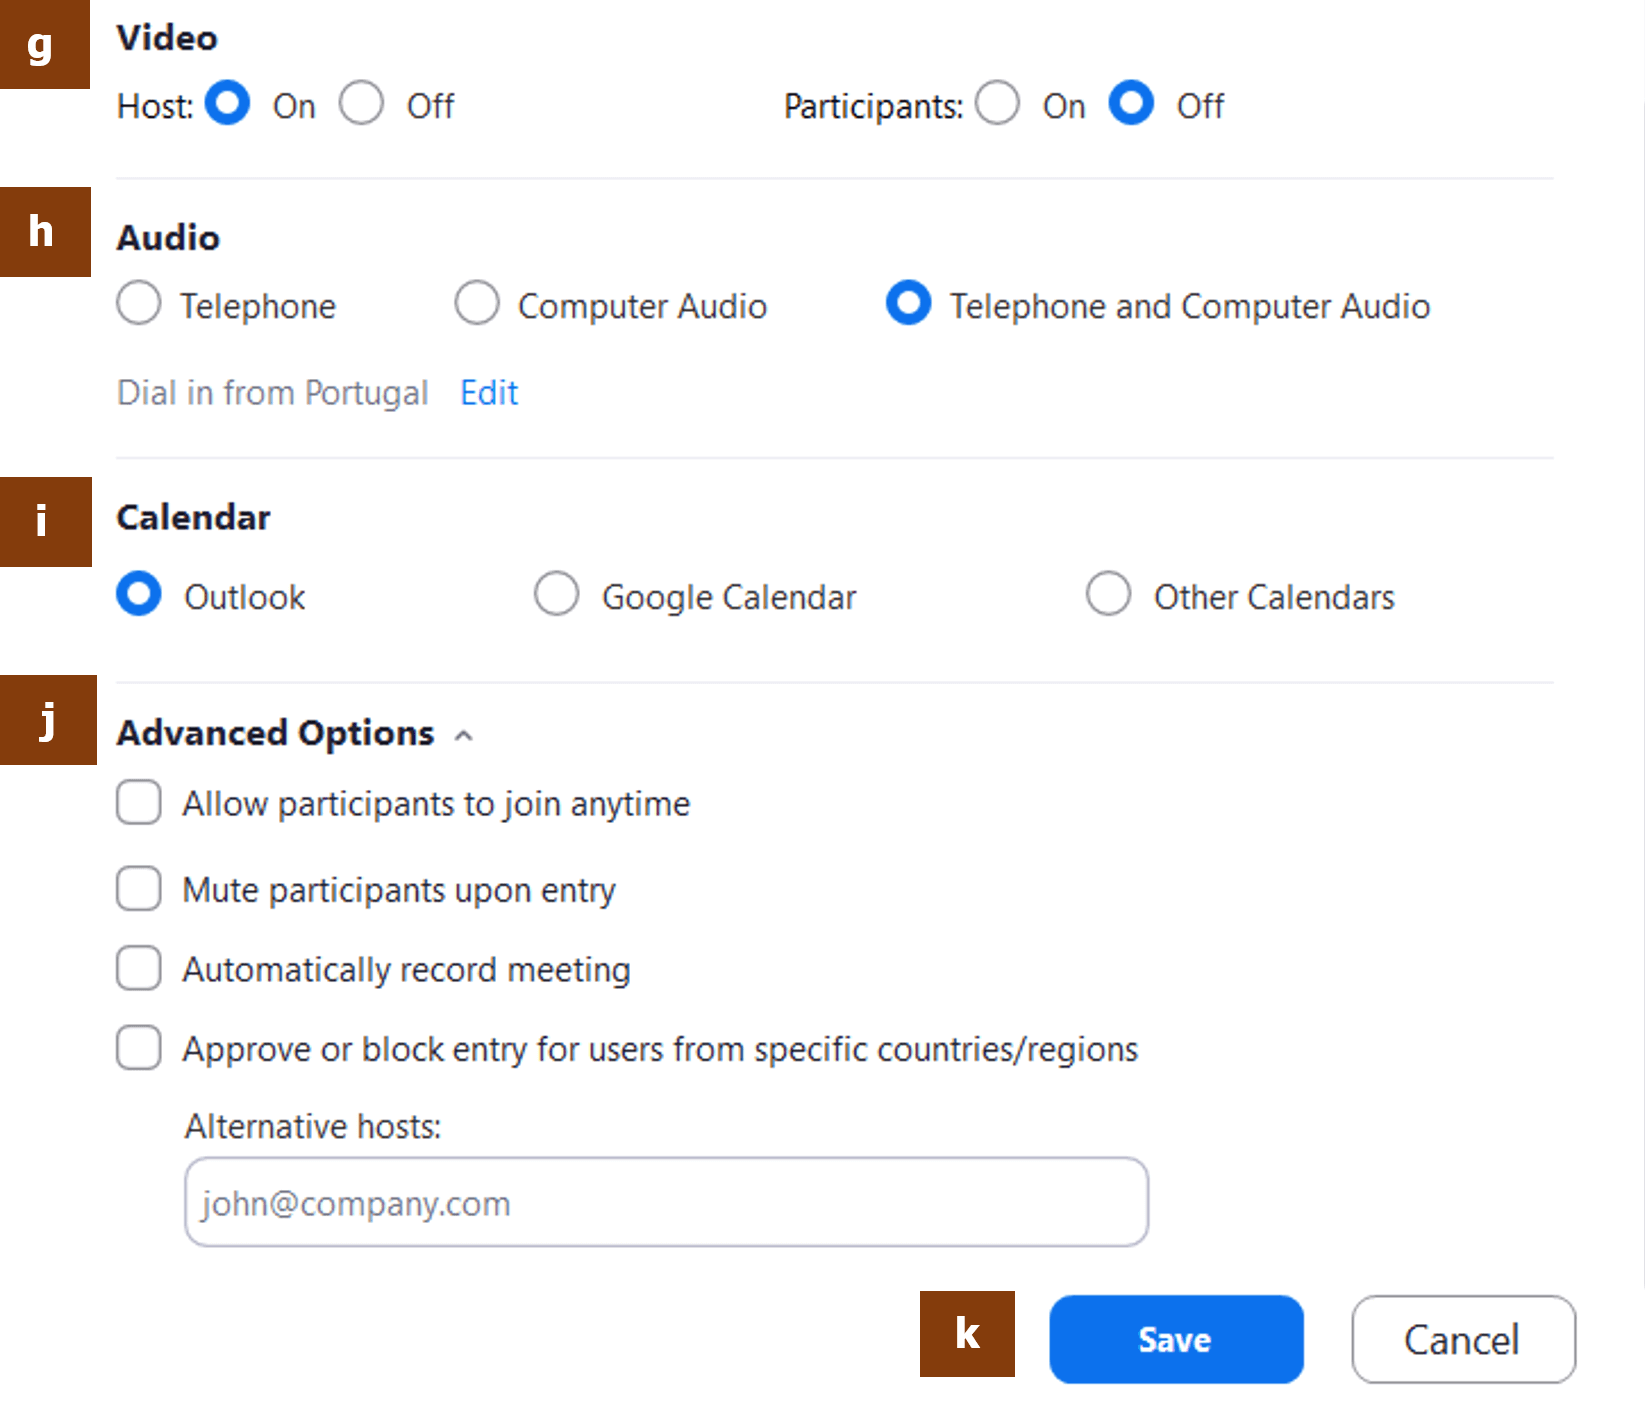
Video – Both you and the participants can enter the meeting with the video on or off.
Audio – It is recommended to select both Telephone and Computer audio. This way the participants can choose the best audio option when entering the meeting.
Calendar – You can update your personal calendar with the meeting information.
Advanced Options - Here you can find further options for the beginning of your meeting, such as automatically recording it from the start.
Click “Save” to finish your scheduling.
Hosting a Zoom meeting
When you host a Zoom meeting, this is the screen you will see.
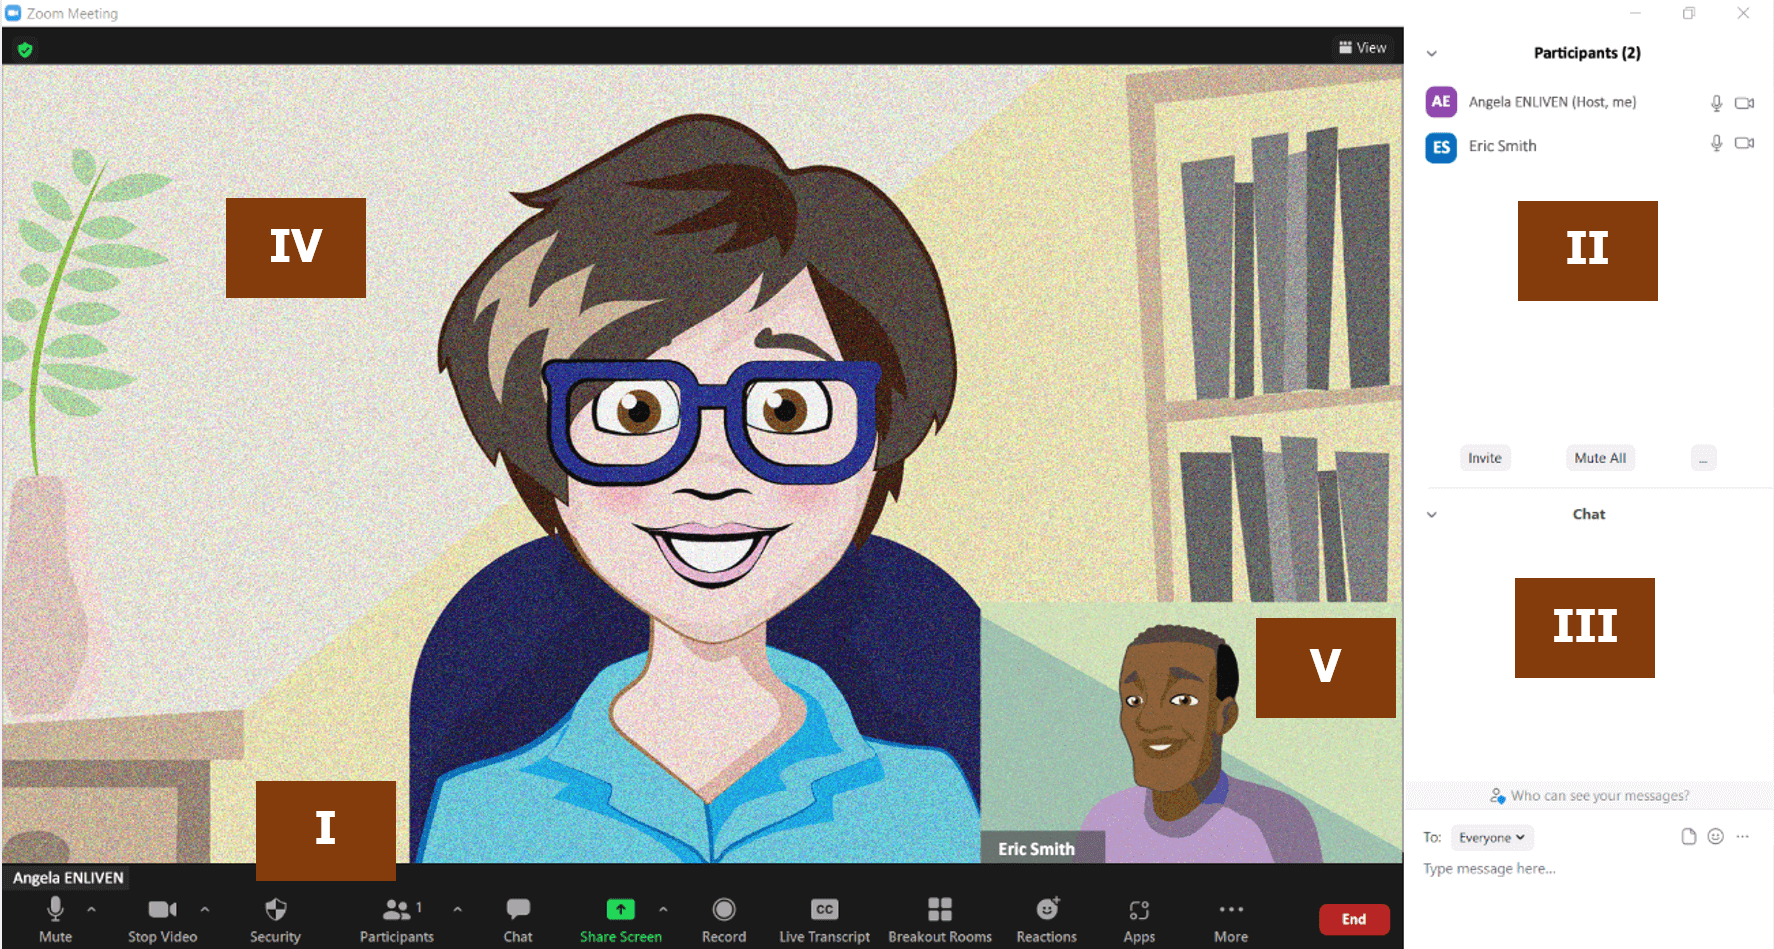
Let us go through each section of this screen, to better understand all the features available.
I - Zoom Toolbar
At the bottom of your screen, you will find a toolbar with several options to make your virtual meeting more pleasant and interactive.

These are the features available:
Audio:
 |
 |
Clicking directly on this icon you can mute and unmute the audio.
By clicking on the upper right corner arrow you can go to the Audio Settings. Here you can select as well the Microphone and the Speaker.
Video
 |
 |
Clicking directly on this icon you can stop and start the video feed.
By clicking on the upper right corner arrow you can go to the Video Settings. Here you can select as well the Camera, choose a virtual background or a filter.
Security:
 |
Clicking on this icon you can manage the security options of your meeting. You can:
- Lock meeting
- Enable waiting rooms
- Hide profile pictures
- Allow participants to:
- Share screen
- Chat
- Rename themselves
- Start vídeo
Participants:
 |
Clicking on this icon you will open the participants list on the right side of the Zoom window (II).
By clicking on the upper right corner arrow you can invte other participants to join your meeting.
Polling:
 |
This feature allows to create simple polls to keep your audience engaged.
You can create the poll previously, in the Zoom portal, when you are scheduling the meeting. You can also create the poll during the meeting, by clicking on the “Poll” icon. A window will appear and go to “Create”.
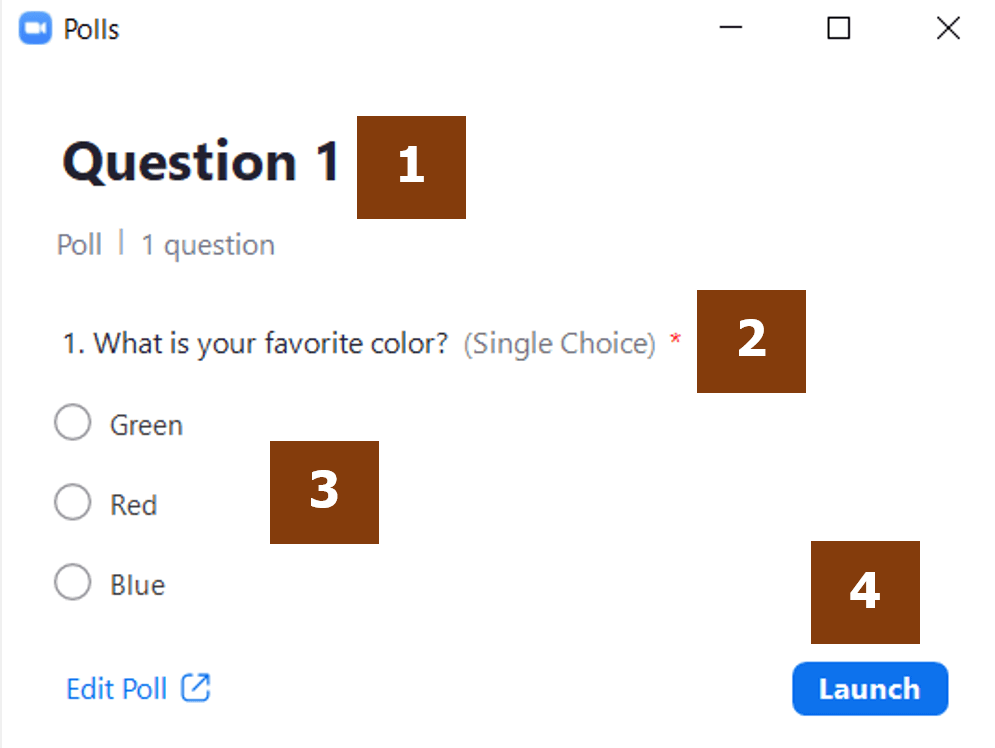
You will be redirected to the Zoom portal, where you can create the new poll.
(1) Give a name to your poll.
(2) Write your question.
(3) Write different choices.
(4) Launch the poll.
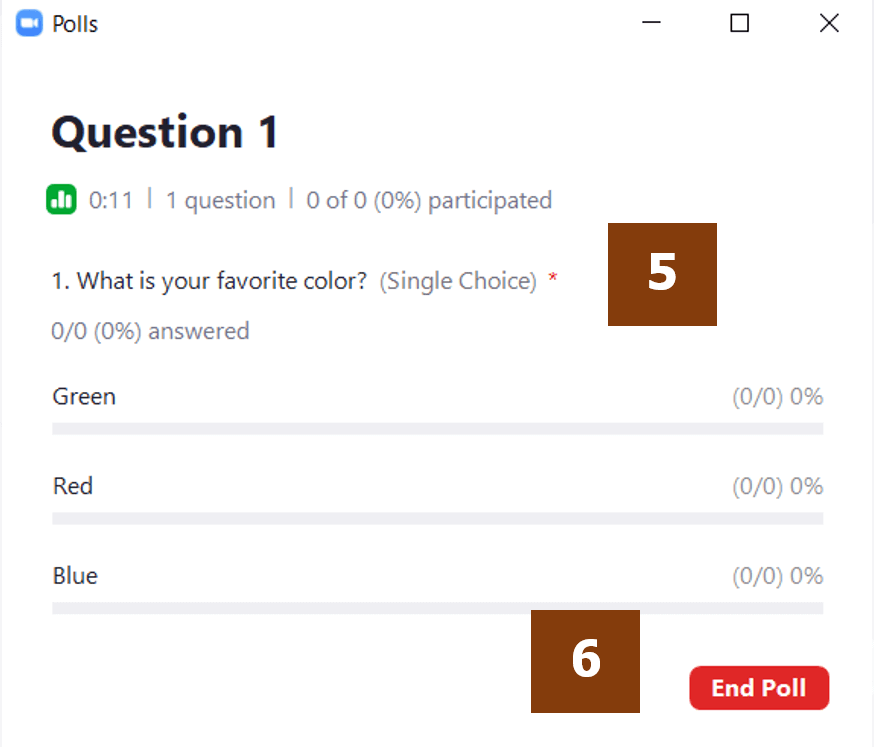
The participants in the meeting will now be prompted to answer the polling questions.
The host will be able to see the results live (5).
To stop the poll, click “End Poll” (6).
You can share the results to the participants in the meeting, by clicking “Share Results”.
It is possible to obtain a report for this poll, using the Download button. This will launch your default web browser so that you can download the entire poll report, which shows each participant’s choice.
Chat:
 |
Clicking on this icon you will open the chat box on the right side of the Zoom window (III).
Learn more about participation in chats.
Share Screen:
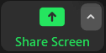 |
By clicking on the upper right corner arrow you can allow one participant to share at a time or allow multiple participants to share simultaneously.
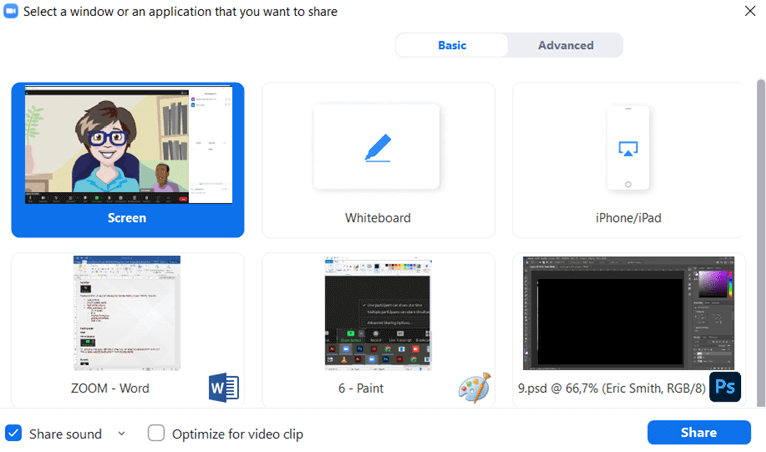
When you click on this icon to share your screen, a window will appear with several options for you to select. The first one (Screen) will allow you to share evrything you have open in your personal screen. You can choose to share only a whiteboard (where you can write), your iPhone/iPad contente or just a specif file that you have already open in your desktop, such as a powerpoint presentation or a video.
Please note that, if the content you are about to share has audio, you will have to check the option “Share sound” at the bottom left corner of this window.
After selecting your option, click “Share”.
Record:
 |
You can start recording your Zoom session during the meeting. Once you click on this icon, a message will pop-up on every participants’s screen mentioning that the session is being recorded and the following sign will appear at the top of the window:
 |
You can pause or stop the recording at any time.
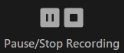 |
This recording will be converted to mp4 when the meeting ends and you can save it in your computer.
Live transcript
 |
This feature enables closed captioning during your meeting, providing subtitles of the spoken in-meeting communications.
Breakout Rooms:
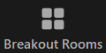 |
This is an icon that only the host or co-host can see.
Breakout rooms are sessions that are split off from the main Zoom meeting. They allow the participants to meet in smaller groups, and are completely isolated in terms of audio and video from the main session. Breakout rooms can be used for collaboration and discussion of the meeting.
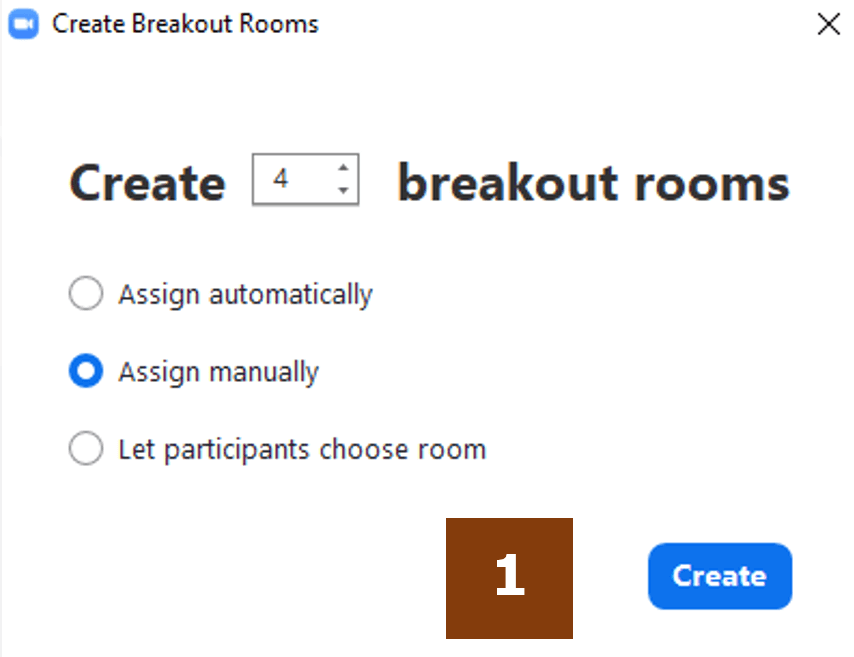
The first step is to click on the icon above and a window will pop-up for you to create a specific number of breakout rooms. The participants can be assigned to each room:
- Automatically (the participants are randomly distributed among the rooms, with the exception of the host);
- Manually (the host can assign specific participants to each room);
- Each participant can choose a specific room.
When you click on “Create” (1) the breakout rooms will be generated and a new window will pop-up.
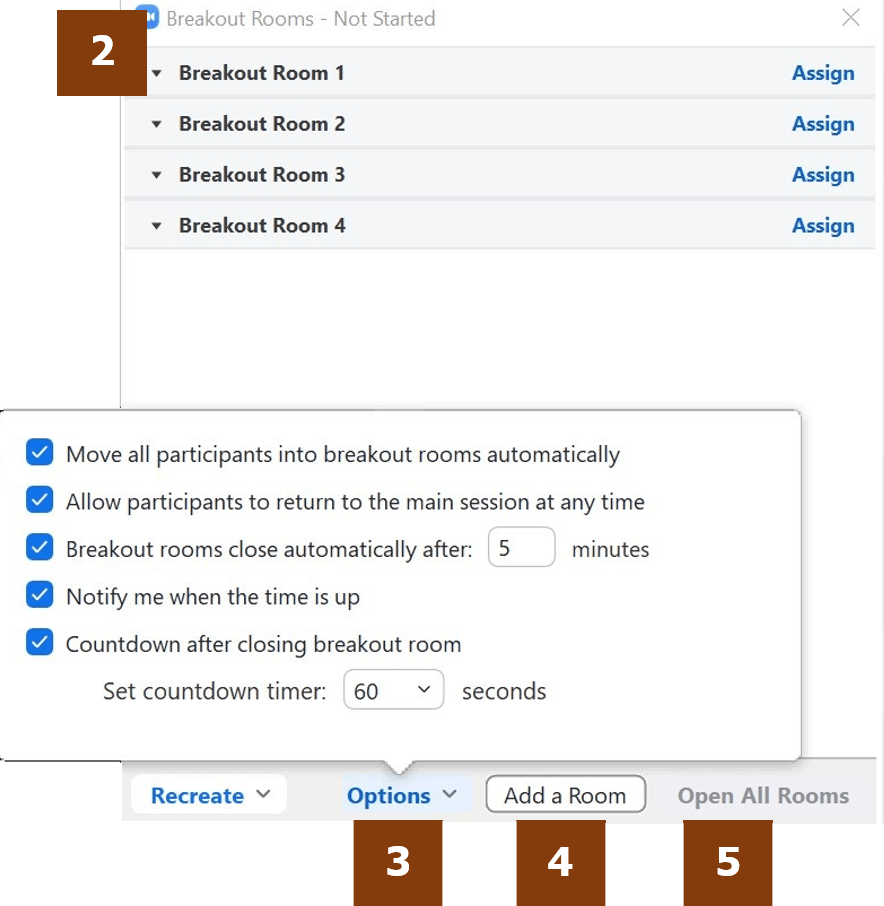
After the rooms are created you can always move the participants from one room to another. You can also rename the rooms by clicking in their label (2).
At the bottom of this window you will find a button with “Options” (3) that you can check in case you want to:
- Move all participants into the breakout rooms automatically;
- Allow participants to return to the main session at any time;
- Define the duration of the breakout sessions;
- Send a warning to notify the participants when the session is about to end;
- Display and setup a countdown for returning to the main session after the breakoutrooms are closed.
If you need to, you can add more breakout rooms by clicking on “Add a Room” (4).
After you setup all this options, you can open the breakout rooms by clicking on “Open All Rooms” (5).
The host can join a breakout room at any time.
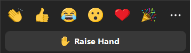
Reactions:
 |
During a meeting, if you want to react to something, click on this icon and you will find a list of emoticons from where you can choose which one better represents your reaction. This emoticon will appear in the corner of your personal screen for everybody to see.
If you just want to say something, please click on “Raise Hand”. The raise hand icon will appear on your screen and in the participants list, so that the host can give you the floor.
 |
Apps:
 |
Add apps to enhance your Zoom experience.
More:
 |
Here you can find the options to stream your meeting live, for exemple, on Facebook or on Youtube.
Top bar:
There is also a bar at the top of the window, that will show the following icon, on the left:
 |
If you click on this icon, the basic details of the meeting will be presented, such as the meeting link and ID.
End Meeting:
When you want to end or leave your Zoom meeting, just click on “End”.
 |
And these two options will appear:
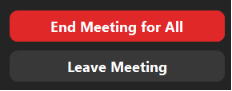 |
If you are the host and you choose to leave without ending the meeting, the host will be assigned to the co-host.
II – Participants list
When you click on the participants icon, a section will open on the right side of the Zoom window (II) with the participants list.
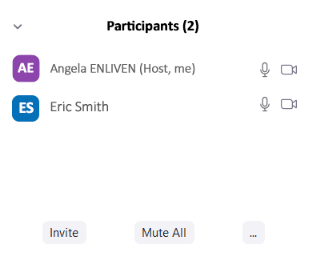
If you are the host, you will see here, as well, the participants that are still in the waiting room.
As the host, you can take the following actions towards the meeting participants, by overing on a specific name:

You can mute each participant and if you click on “More”, these are the options available:
- Chat
- Stop a video
- Pin
- Make Host
- Make co-host
- Put in waiting room
- Remove
- Report
III – Chat box
When you click on the chat icon, a section will open on the right side of the Zoom window (III) where you can send messages (1), files (2) or emoticons (3) to all the participants at the same time or to a specific participant, in private (5).
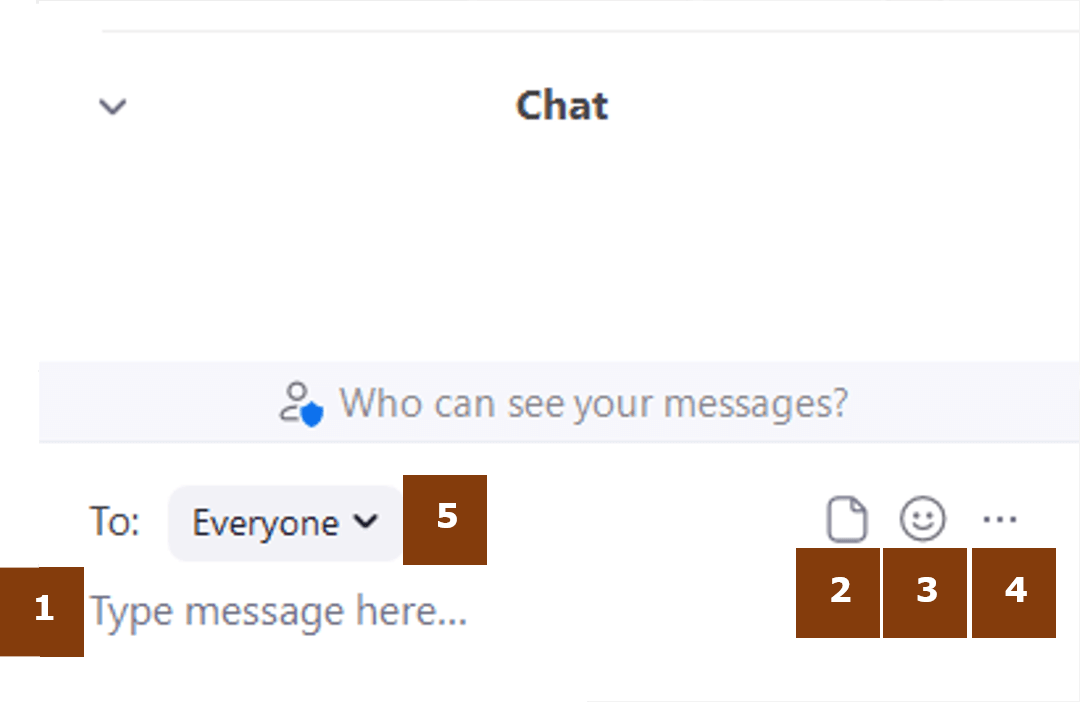
If you click on "..." (4), you can save the chat content.
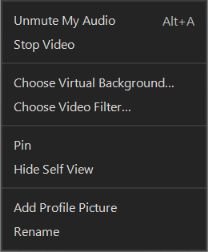
IV – Host Screen
This section of the Zoom window shows the video and name of the host. It will show the host’s reactions, the mute and unmute sign and a profile picture or just the name, in case the host has the video off.
If you right click on this section, you can take several actions that you can find in the bottom toolbar as well.
Specifically, the host can add a profile picture or change the name on display.
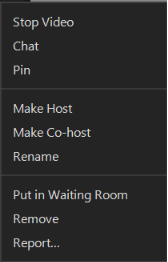
V – Participant screen
The host can take some actions towards each participant overing on the upper right corner of the their sceen and clicking on the options icon (1). A list of action will appear. The host can take the same in the participants list (II) as we mentioned before.
 |
 |
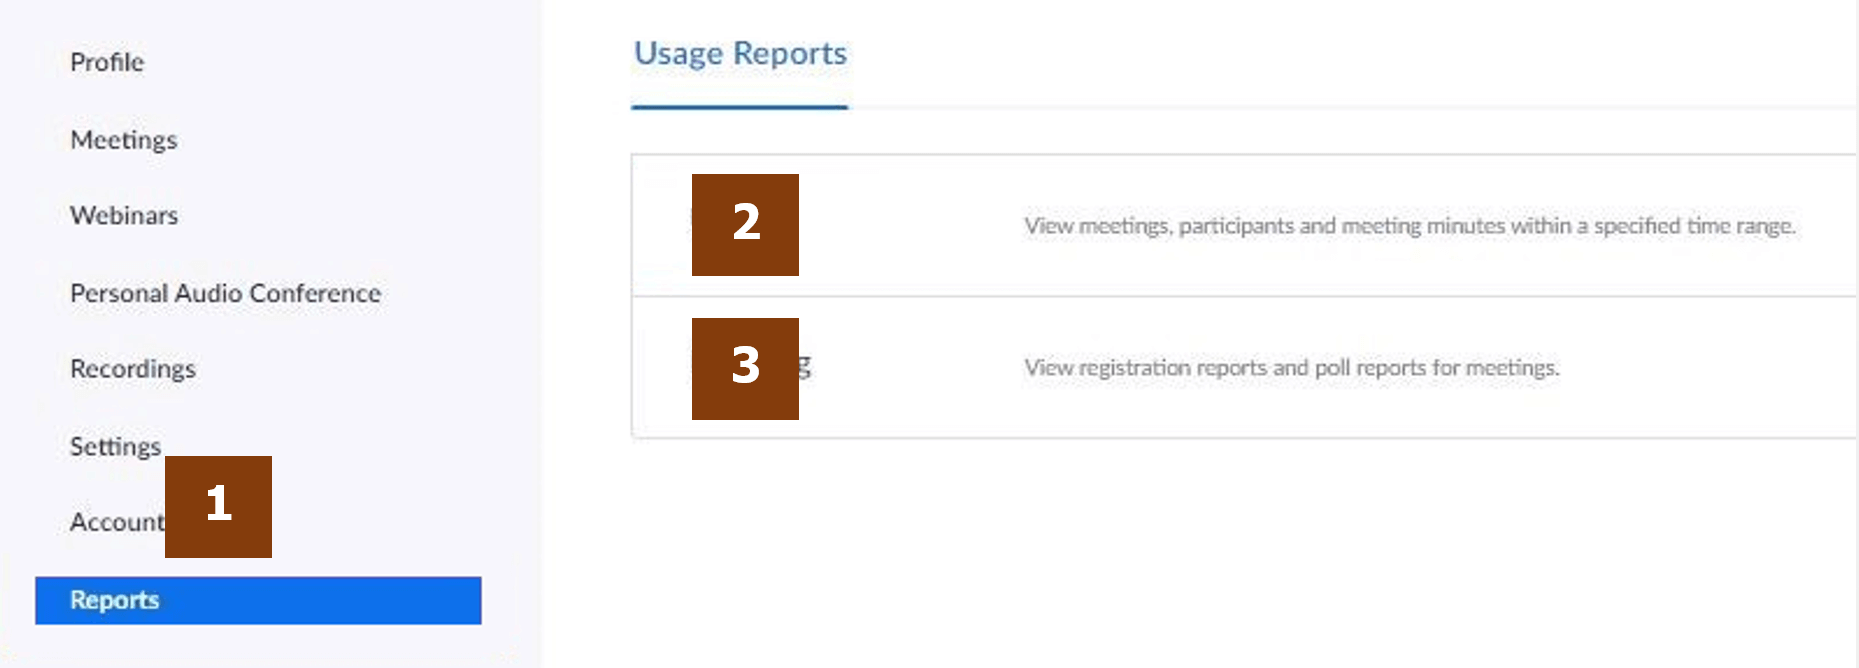
Reports
In the Zoom portal, there is a section for the Zoom Reports (1).
Here you can find and download:
- Usage Reports (2) – here you can find your past meeting within a time range, their duration and number of participants.
- Meeting Reports (3) – here you can find registration and poll reports for your past meetings.