

 Italiano
 Português
 Deutsch
 Српски језик
 Eesti
EestiWhat is Moodle?
Moodle explained with Lego blocks
How to get started
- What are the different ways of installing and using Moodle?
- Moodle Dashboard
Setup your Moodle course: homepage, students
- What is a Moodle course?
- Create a new Moodle course
- Student enrollment
- Moodle course homepage
- How to edit course sections?
- What are blocks?
Handle communication: messages and forum
- Instant messaging
- Sending and receiving messages
- Chat
- Forum
Handle content: Moodle editor, resources and activities
- Moodle editor
- Resources
- Activities
- How to add resources and activities?
Collect information: choices, feedback
- What is a Choice activity?
- How to ask for feedback?
Evaluate: assignments, quiz, question bank
- Assignments
- How to grade assignments?
- How to add a Quiz?
What is Moodle?
Moodle is a Learning Management System (LMS) that supports the entire process of learning/teaching, from the creation of courses to the delivery of educational content. Designed to create opportunities for rich interaction between teacher and learners, it is an Open Source platform widely used for distance, blended (flipped classroom) and in presence learning. It was built with educational approaches of social constructionist pedagogy but supports other learning approaches as well. With Moodle you can add resources, create activities, use its internal messaging system, monitor and evaluate your students progress throughout your courses.
Moodle explained with Lego blocks
Moodle is a modular platform that allows it to expand its capabilities through plugins and configurations. This architecture can be explained through the analogy with Lego blocks. Each block adds a feature or configuration option that can be used by teachers and learners.
Moodle explained with Lego blocks (Slides)
How to get started?
Moodle can be installed and run on personal computers, network servers, or hosted as a cloud service. You can also use Moodle on your mobile devices, smartphones and tablets, thanks to the official Moodle App (available for Android and IOS).
Typically, as a teacher you will use your institutional Moodle installation with a course already configured for you. If this is the case, feel free to jump to the section: “Setup your Moodle course” to get started with a new Course.
What are the different ways of installing and using Moodle?
- Local installation (free)
Everyone can install their own Moodle platform instance by following the official instructions. - Cloud hosting (costs vary depending on different pricing plans)
There are multiple commercial providers who offer to host your Moodle site on their servers. Moodle also offers its own hosting solution called: MoodleCloud plan. This option may be particularly useful for trials, institutions without the possibility of hosting their own Moodle installation or with limited capability of maintaining the infrastructure. - Moodle sandbox (free)
This option does not require an installation, it is provided by Moodle as a tool to perform experiments (trial and errors without the risk of breaking the platform).
Follow this link in order to access a demo version of Moodle.
You will be asked to select between two types of Moodle sites. They differ visually because of the theme customization options applied to them and the content they start with:

Image 1: Sandbox choice of the demonstration site
- The leftmost option (1) allows you to start with a demo site with some built-in content to start with. This is meant to represent a real-school environment through a fictional institution called “Mount Orange School”. Here you will find a number of predefined courses with a showcase of Moodle features like: assignments, databases, quizzes and much more... You can freely explore and modify these complete course examples.
- The rightmost option (2) is an empty Moodle installation. Here you can start exploring Moodle functionalities from scratch.
Pay attention to the timer situated at the bottom right corner of each site, after it gets to zero all your progress will be lost and Moodle will return to its initial state. Every hour the site resets. Other people may be using the demo site at the same time so you may find your content suddenly deleted or modified.

Image 2: Sandbox reset timer
Image 2: Sandbox reset timer
The next step to access the sandbox is authentication. There are some predefined demo accounts with associated roles that you can use during the login phase. Your experience will vary according to the role you choose. The login credentials are listed on the respective login pages:
“Mount Orange School” Demo:
- Go to the login page
- Use one of the following accounts:
- Student (username: student / password: moodle)
- Teacher (username: teacher / password: moodle)
- Manager (username: manager / password: moodle)
- Parent (username: parent / password: moodle)
- Privacy officer (username: privacy officer / password: moodle)
Moodle sandbox Demo:
- Go to the login page
- Accounts:
- Student (username: student / password: sandbox)
- Teacher (username: teacher / password: sandbox)
- Manager (username: manager / password: sandbox)
- Admin (username: admin / password: sandbox)
Once logged in you will be able to make experiments, make use of this tutorial and explore Moodle
Moodle Dashboard
By default after a successful login both teachers and students are redirected to their own Dashboard page. Here you can find all your courses, as exemplified below. This page is highly customizable but the core elements are the courses.
Select a course from your list to continue exploring the next Moodle topics.
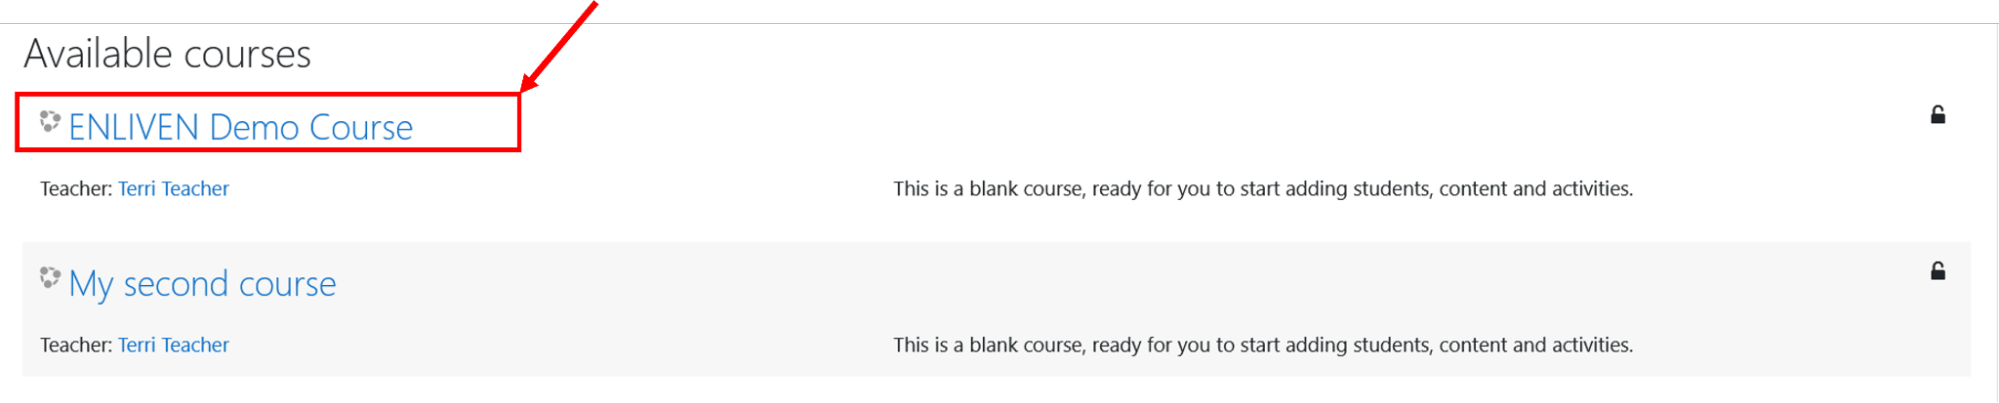
Image 3: Example of Dashboard (classic)
Image 3: Example of Dashboard (classic)
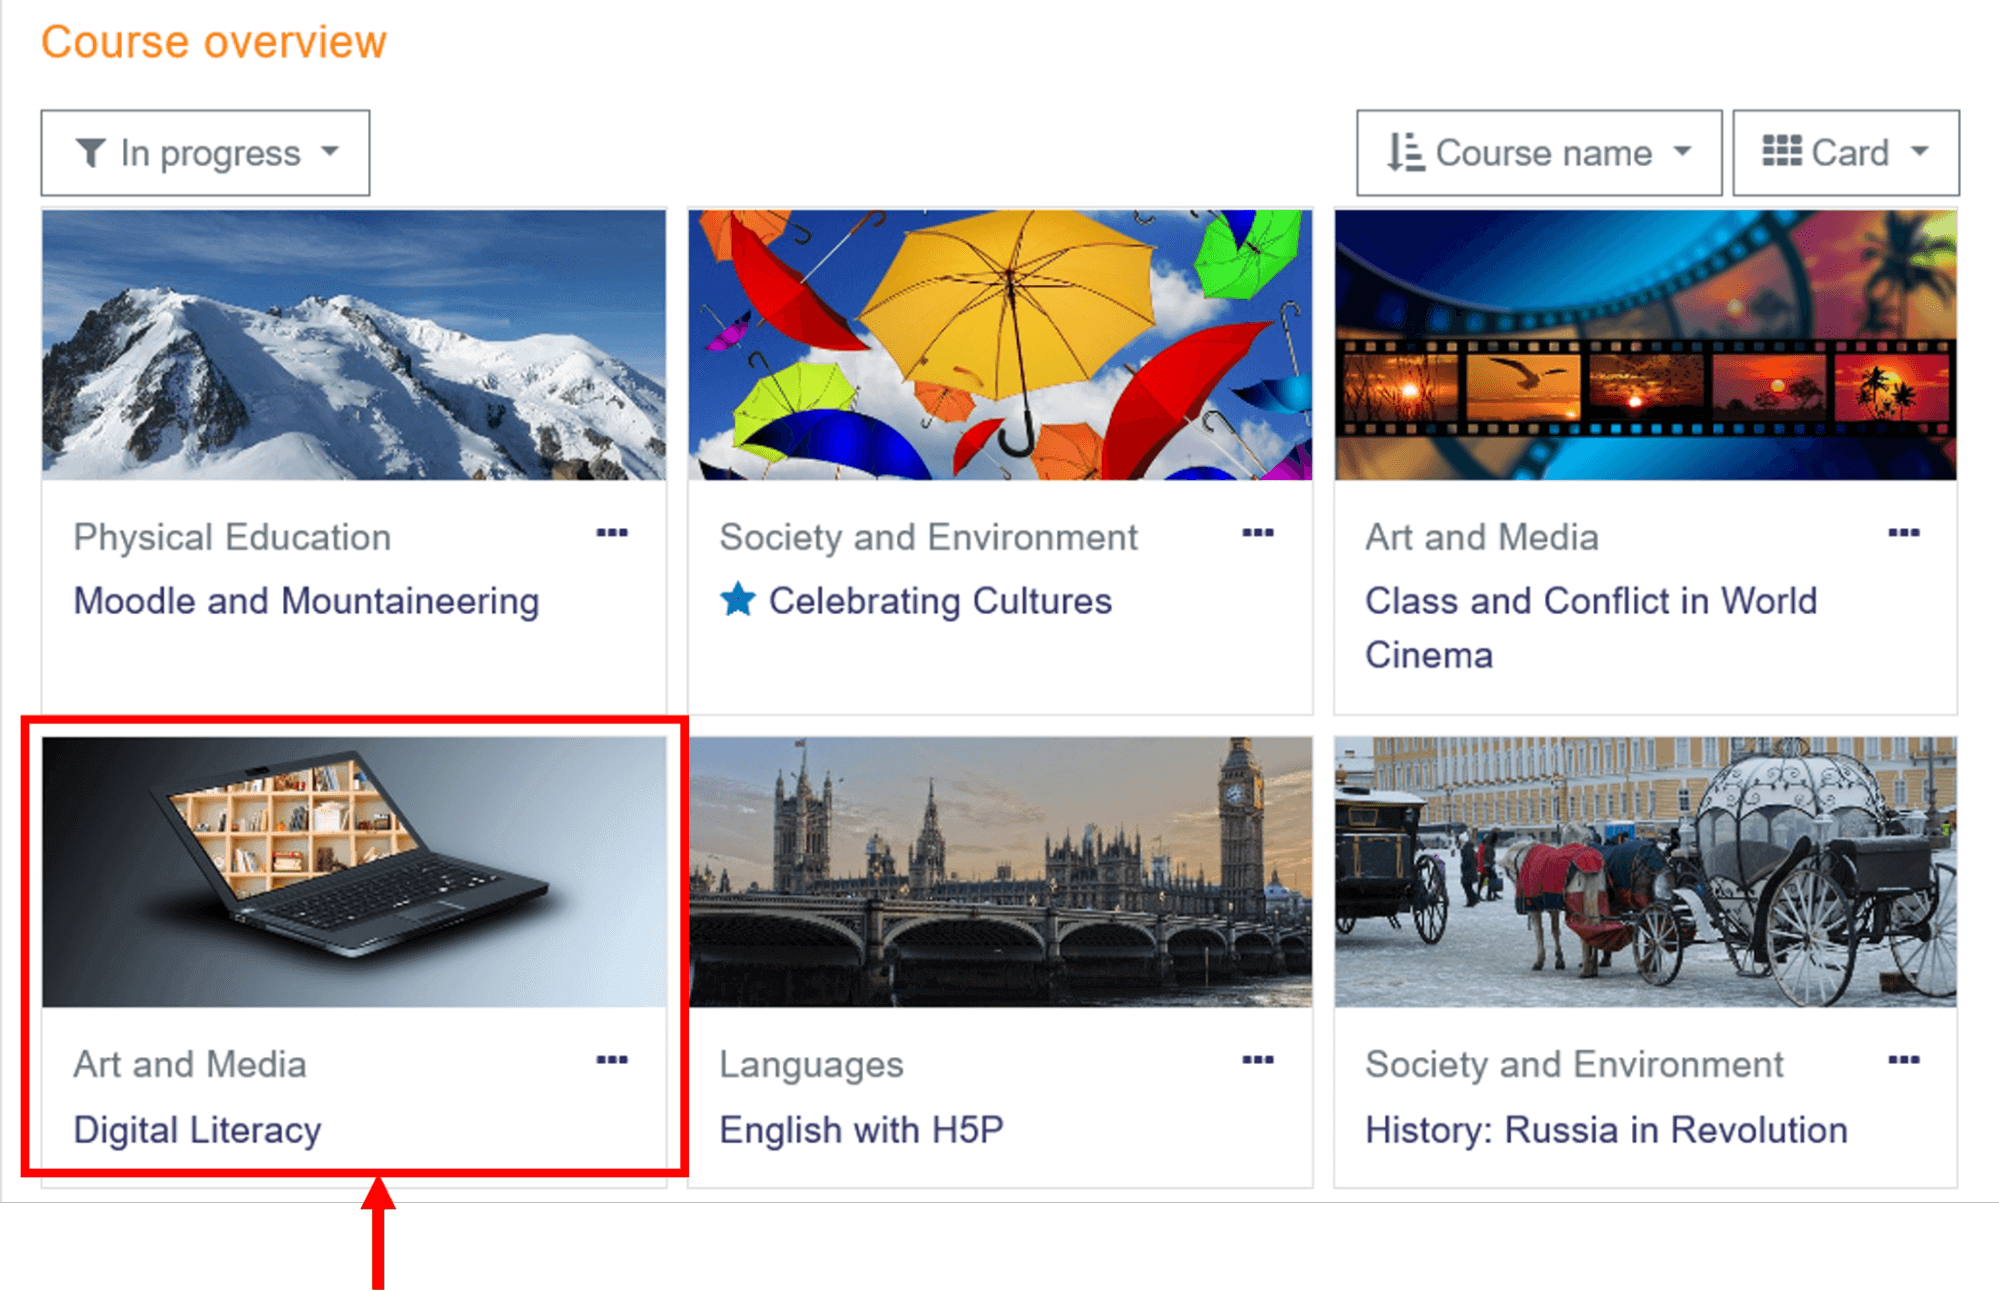
Image 4: Example of Dashboard (customized)
The dashboard can be also accessed by clicking on your user menu, visible on the top right side of your screen, and selecting the “Dashboard” option from the dropdown menu.
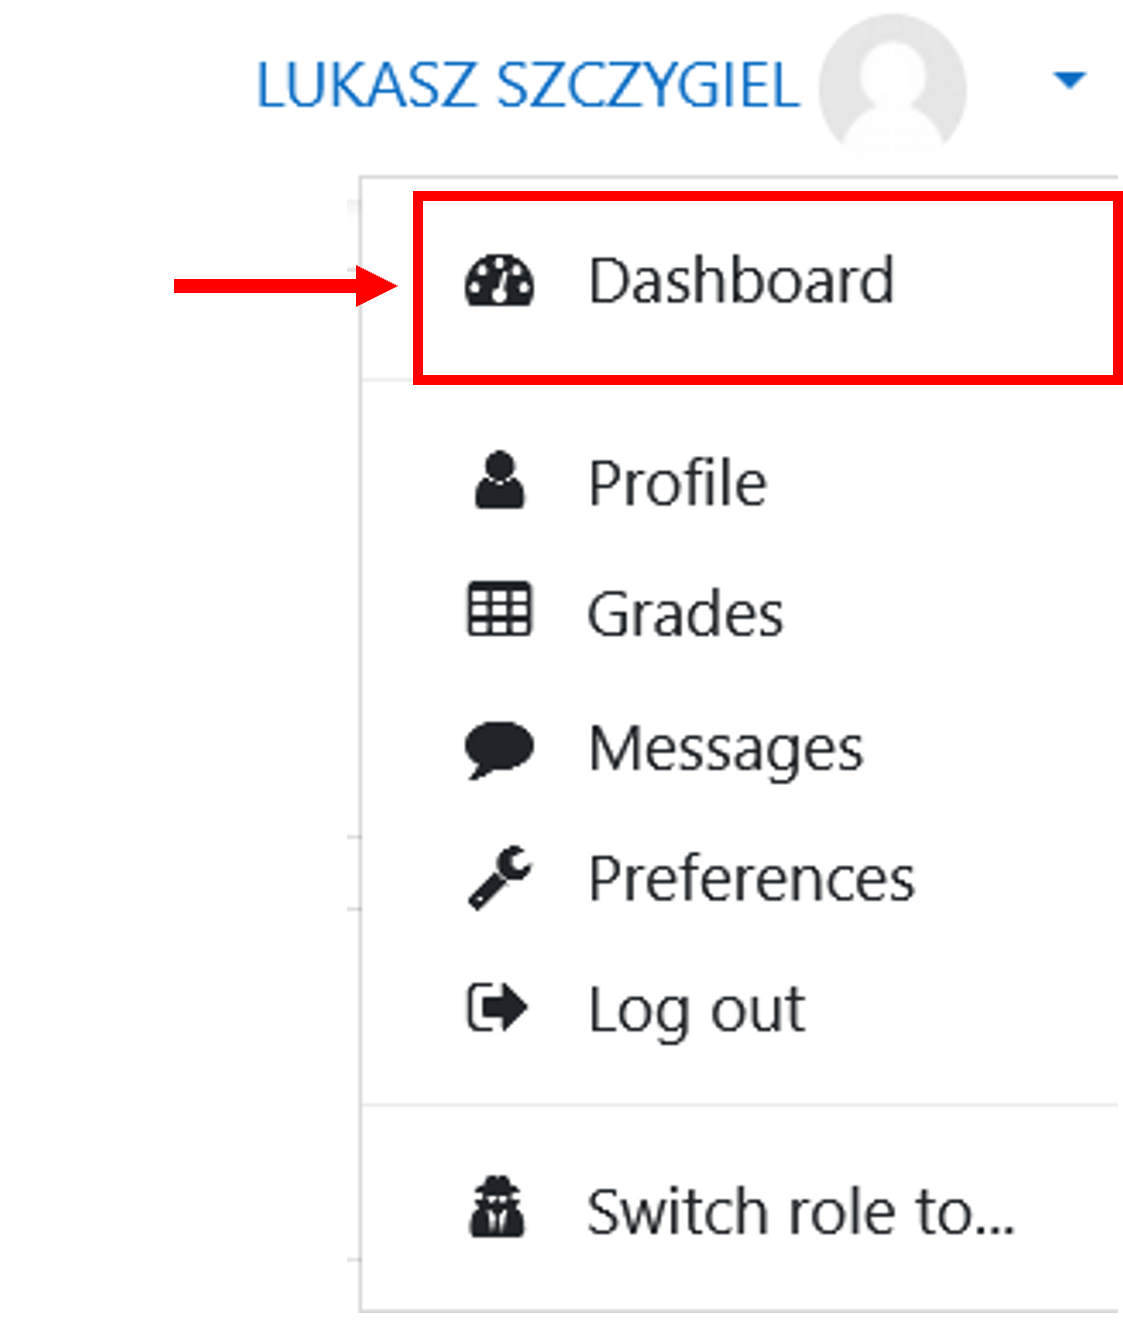
Image 5: Dashboard access from user profile dropdown menu
Image 5: Dashboard access from user profile dropdown menu
Setup your Moodle course: homepage, students
What is a Moodle course?
A Moodle course is a place where all the learning materials and activities are stored. The course content can be accessed by the course participants.
Learn more about Moodle courses by watching the following video:

Create a new Moodle course
Typically as a teacher you should already have your course created for you by your institution.
However, if you need to create a new course you will need to have administrator privileges. As an administrator you will need to access your Site administration panel, as shown in the image below. You can also access the “Add a new course” option by typing the following URL: www.yourmoodlesiteaddresshere/courses/index.php
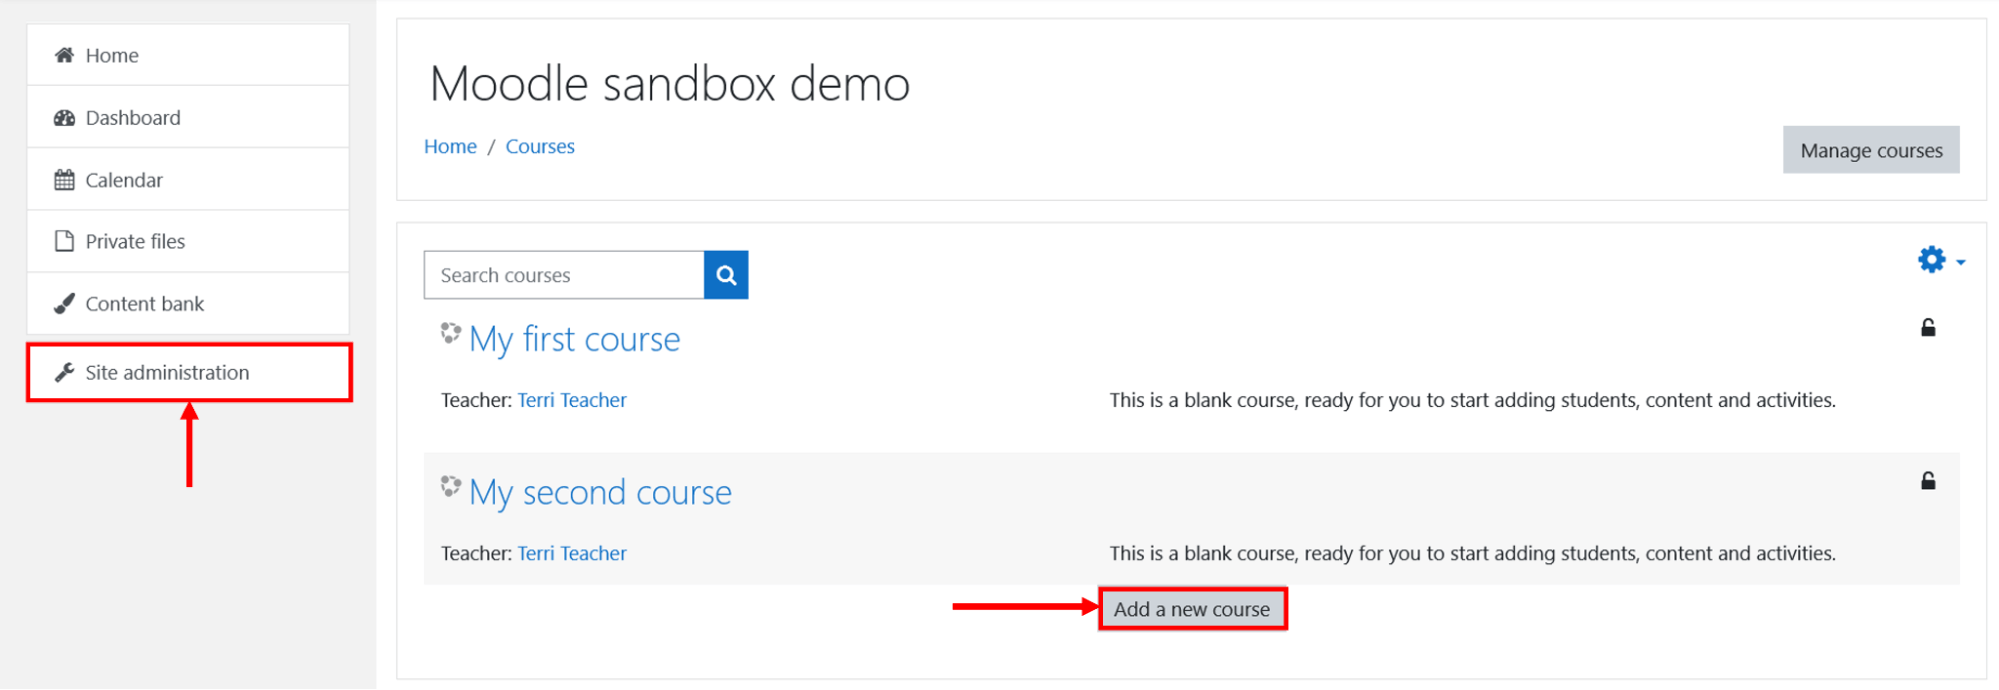
Image 6: Add a new course option
Image 6: Add a new course option
To create a new Moodle Course follow this guide:
Student enrollment
Once inside your Moodle course you can proceed with adding students. You could decide to enable self enrollment, so students can sign up to courses by themselves, or you could add them manually. See the course enrollment documentation for more details about the enrollment process.
Moodle course homepage
Once inside a Moodle course you will be presented with the following User Interface:
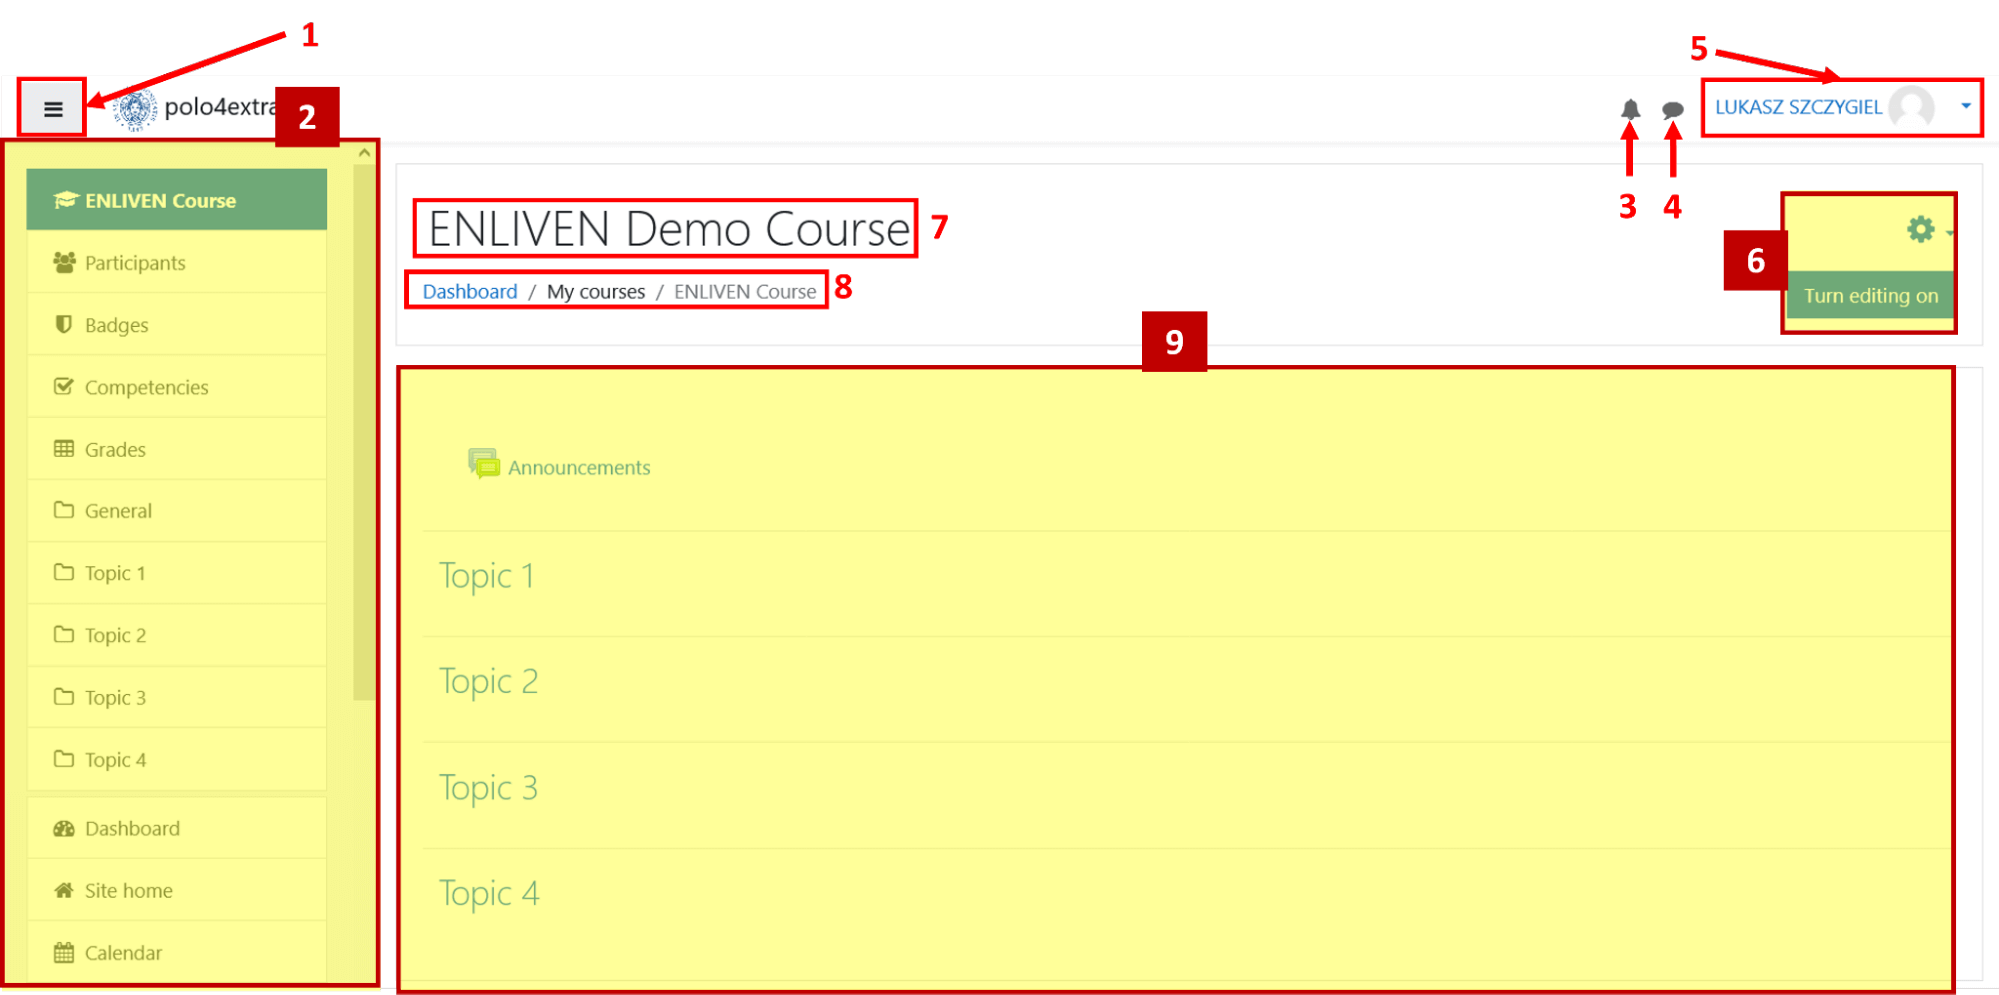
Image 7: Moodle course homepage
Image 7: Moodle course homepage
- Click on the side menu icon (1) to open and close the sidebar (2) on the left side of the screen
- The sidebar, called navigation drawer (2), contains some basic options about the selected course. For example, you can see the course participants, their grades, a summary of your course topics, etc.
- A tiny bell (3) shows the incoming notifications (for example a notice that you were mentioned by some student in a forum post)
- The cloud icon (4) is the messaging feature. You can quickly access your recent conversations from here. Unread messages will also be shown on top of this icon with a notification
- User profile (5), by clicking on it a dropdown menu will appear allowing you to visit your full profile, logout, to set preferences and more...
- Course administration settings (6), the gear icon and the “Turn editing on” button are only visible to teachers or administrators. They allow you to modify the course style and content
- Name of your course (7), this is the full name of your course
- Breadcrumbs (8) are a useful form of navigation indicating the hierarchy of pages which separates you from the Dashboard. The pages, also internal course pages, are separated by slashes (“/”) so you can go back and forth between them
- Course sections (9), this is a workspace where all the learning materials and activities can be displayed. For example the topics within these sections could be ordered by date, by topic or some other layout
You can also inspect some examples from the official Moodle documentation about the course Homepage.
How to edit course sections?
If you want to add or edit your course content you have to enter the edit mode. As a teacher you can click on the “Turn editing on” button to be able to modify your courses.

Image 8: Turn editing on button
Image 8: Turn editing on button
Once you enter the edit mode you will be able to:
- Add a new course section
- Move the course sections, resources and activities
- Edit an already existing course section
- Delete course sections
Inside a course section you can add resources and activities.
What are blocks?
Blocks are elements that provide some sort of information or access to Moodle functionalities. They can be positioned within any Moodle page and are a useful tool to personalize and configure your own course.
Some examples of block elements are the following:
- Online users block
- List of users that were online within the last five minutes
- Calendar block
- Shows the upcoming and pasts course deadlines/events
- Latest announcements block
- Shows recent course news
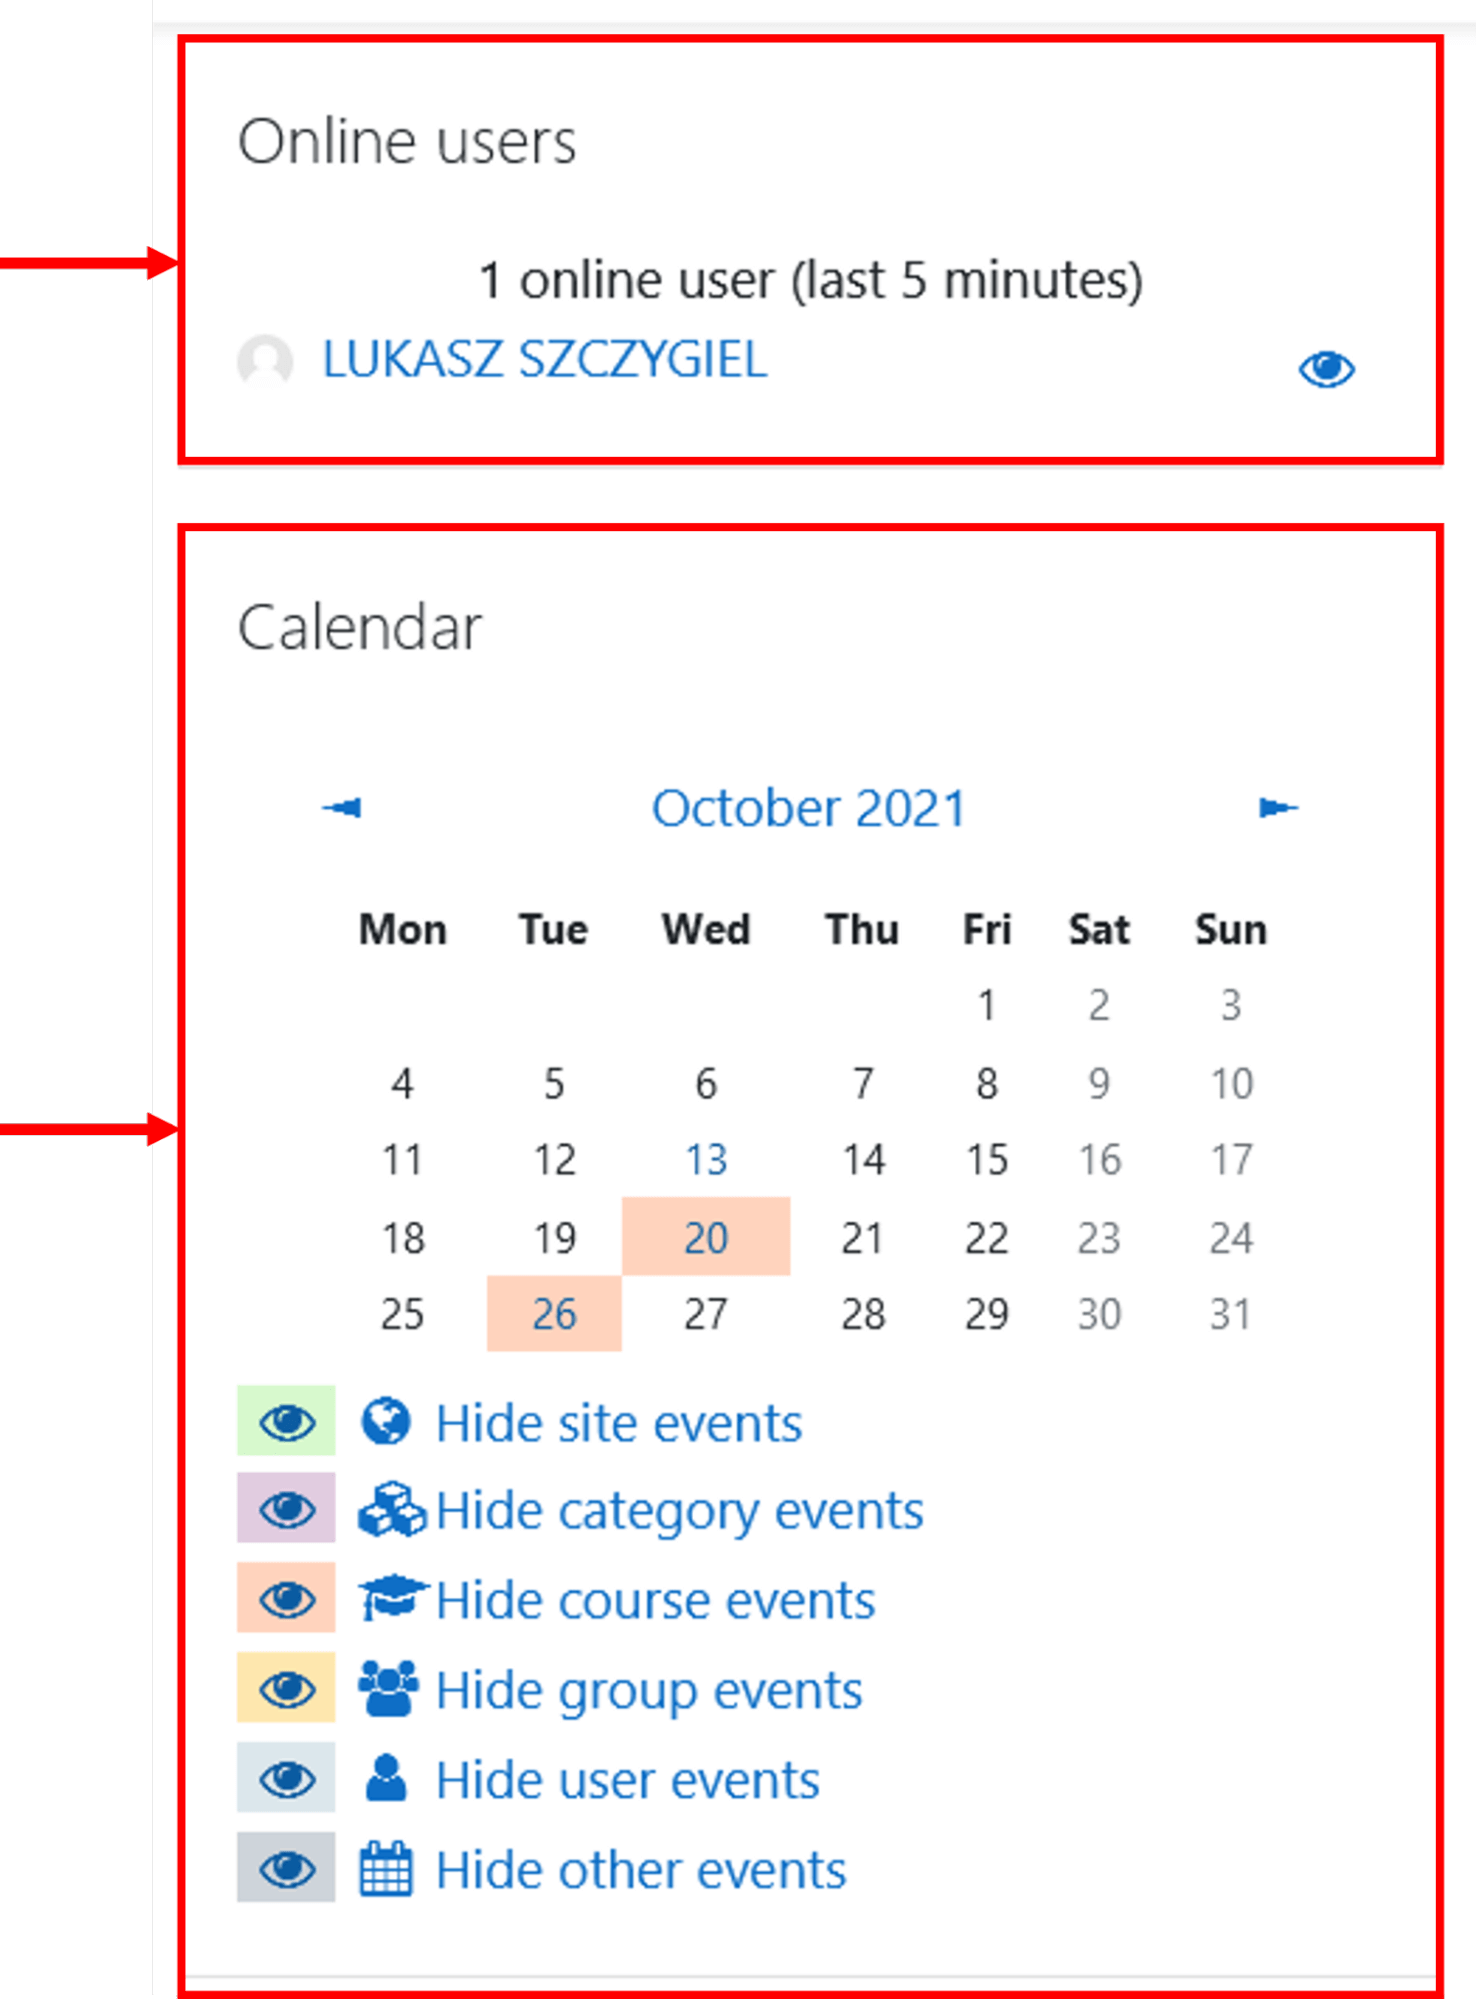
Image 9: Block examples
Image 9: Block examples
To add a block you have to enter the edit mode. Then at the bottom of the navigation drawer an option called “add block” will appear.
Handle communication: messages and forum
Moodle allows exchanging messages between course participants, students and teachers. We can send private messages to single users, create group chats and communicate through forums.
Instant messaging
Instant messaging allows you to send and receive private messages. This type of communication is asynchronous, users will have to reload the page to see the last updates, that is the incoming messages.
Sending and receiving messages
We can send instant messages by clicking on the “cloud icon” next to the user name on the online users block (if present):
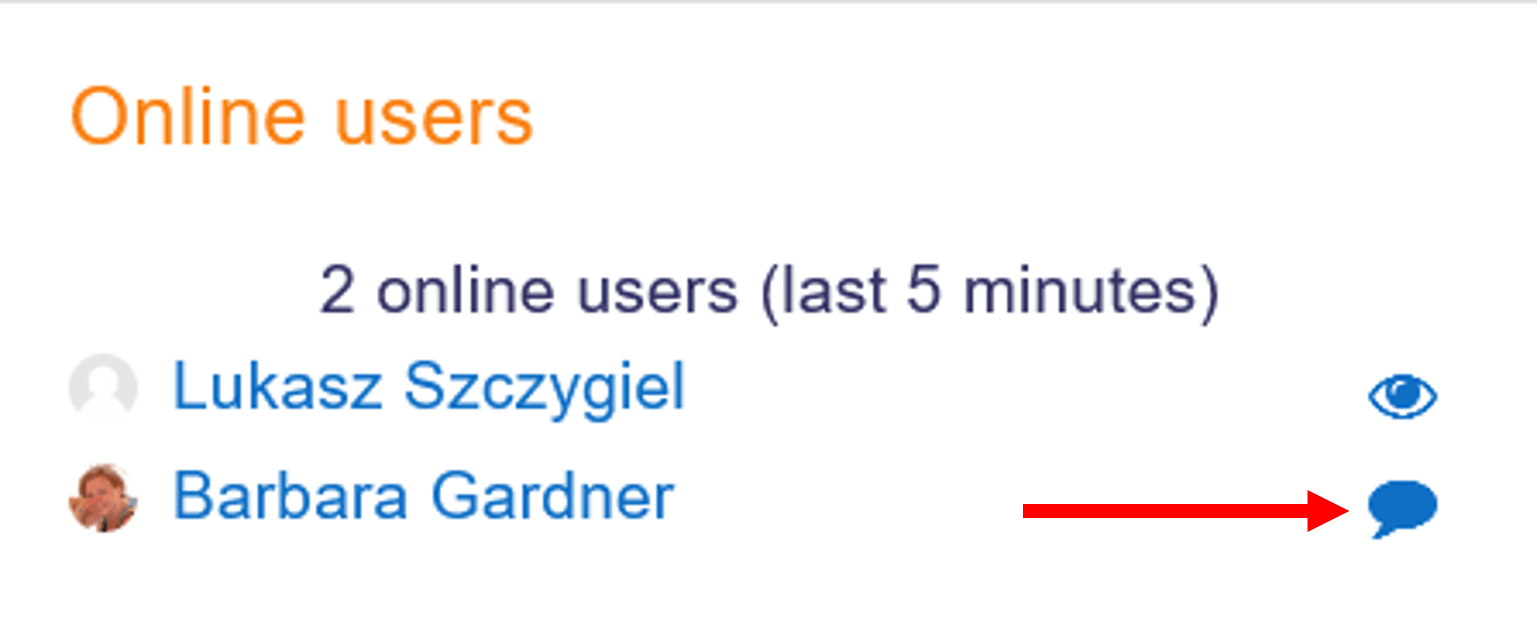
Image 10: Online users block
Image 10: Online users block
Alternatively, if a user is offline, you can go to his/hers user profile (for example from the course participants section). Then click on the “Message” option. This will open the communication window.
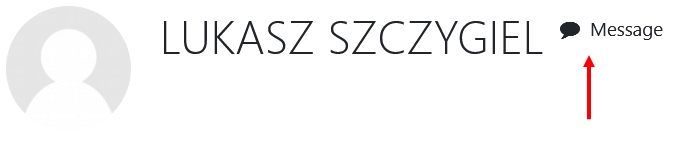
Image 11: User profile message option
Image 11: User profile message option
A notification (a number on a red field) can appear on the top right side of the messages icon, it means that we have some incoming messages that were not read/opened yet.
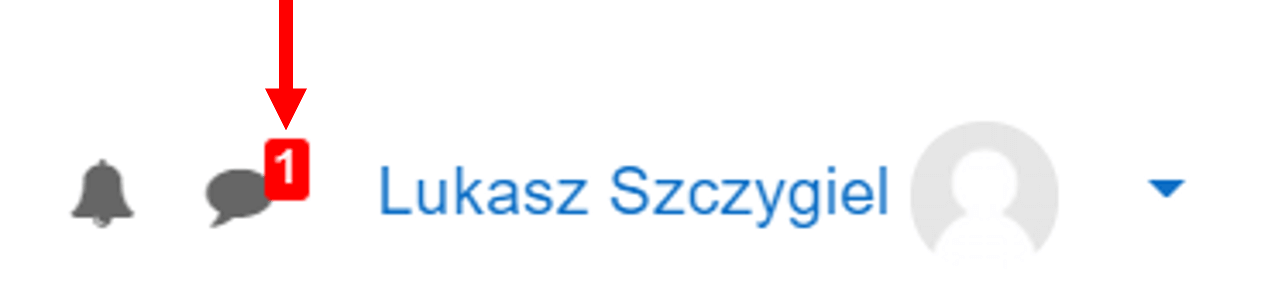
Image 12: Message notification
Image 12: Message notification
To view a message you need to click on it, this will open a new conversation window. Here you can see all the messages you have exchanged and a space to reply back to the conversation, as shown in the image below:
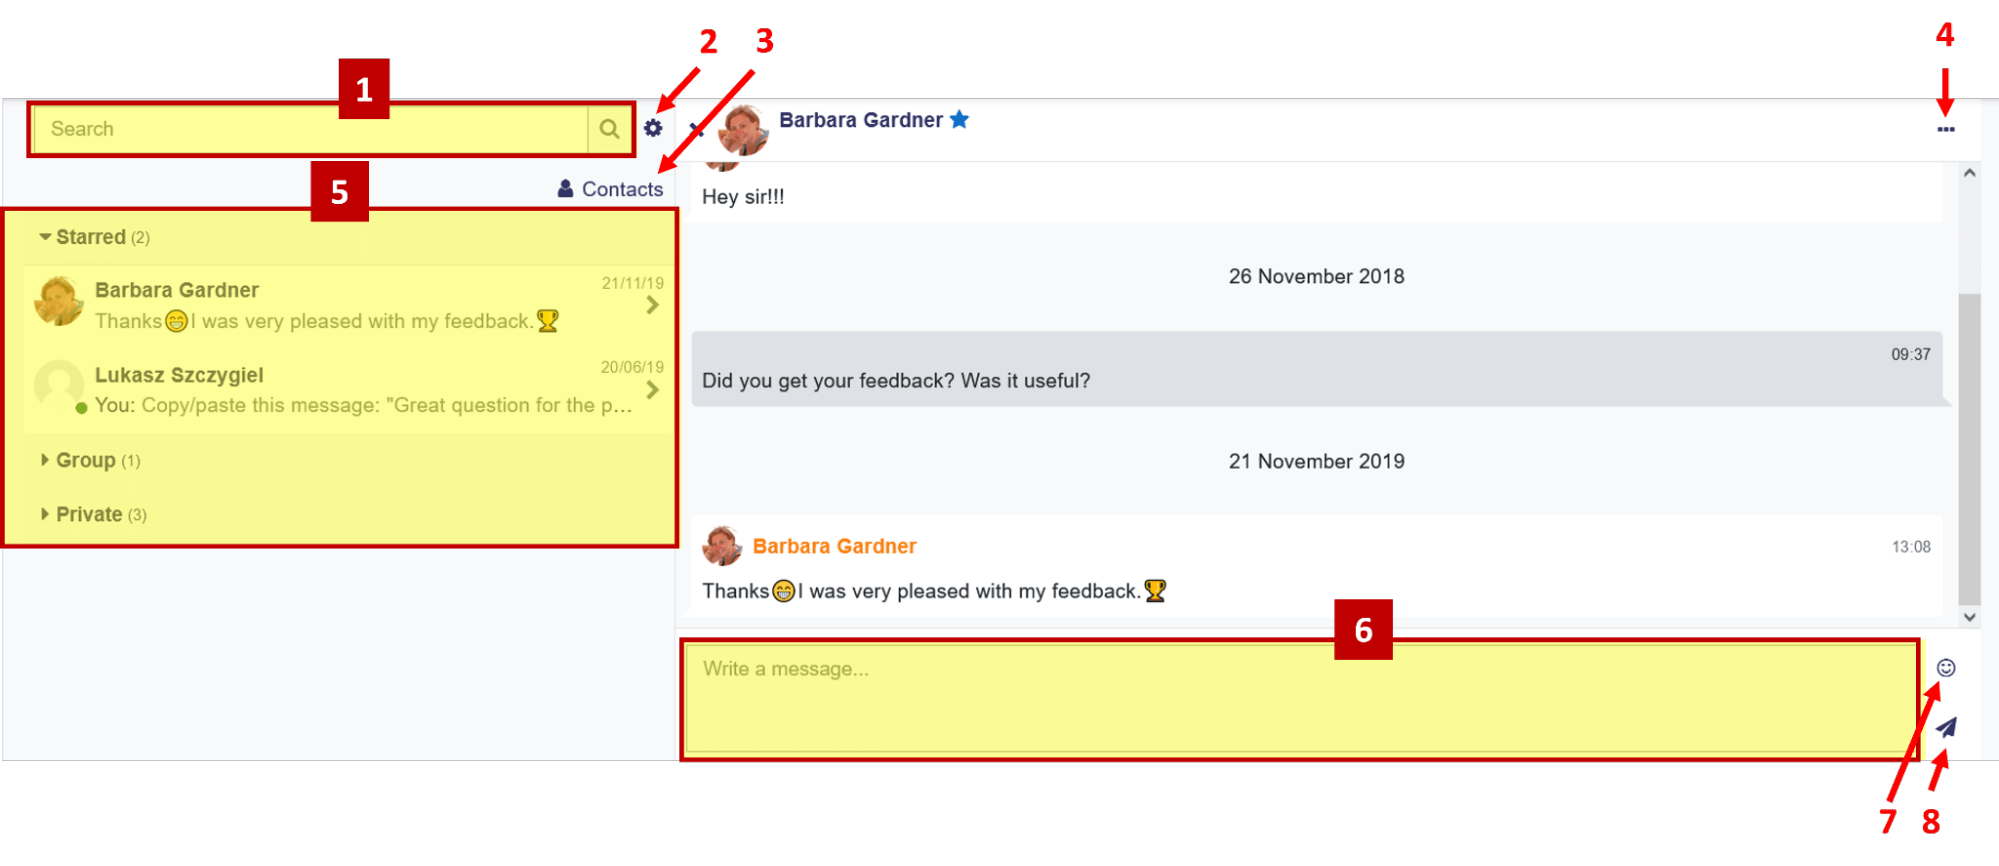
Image 13: Communication window
- The search bar (1) allows you to search for a specific message or person within your communication history
- The cog icon (2) represents settings for messages; here you can set your privacy options to restrict who can send you messages and decide whether you want to receive notifications about the incoming messages
- Contacts (3) opens your personal contacts list
- The three dots (...) (4) let you access some useful options to manage the current conversation. For example, we can add a user to our contacts (so we don’t have to search for him/her each time). In this way, the user will go directly to our Starred category. Here you can also delete or mute conversations.
- The messages are divided in categories (5), by default these are the categories:
- Starred
- Group
- Private
- A space to reply back into the current conversation (6)
- Emoticons (or emojis) (7) to add some emotions to your messages
- The send button (8) to send the message written in the reply space (6)
Chat
Chat allows users to exchange real-time (live) messages with other online users. The communication is synchronous. It has to be enabled by the teacher, you can enter the chat by clicking on the “chat icon” as shown in the screenshot below:

Image 14: Chat activity example
Image 14: Chat activity example
Then enter the chat to join a real time text discussion:
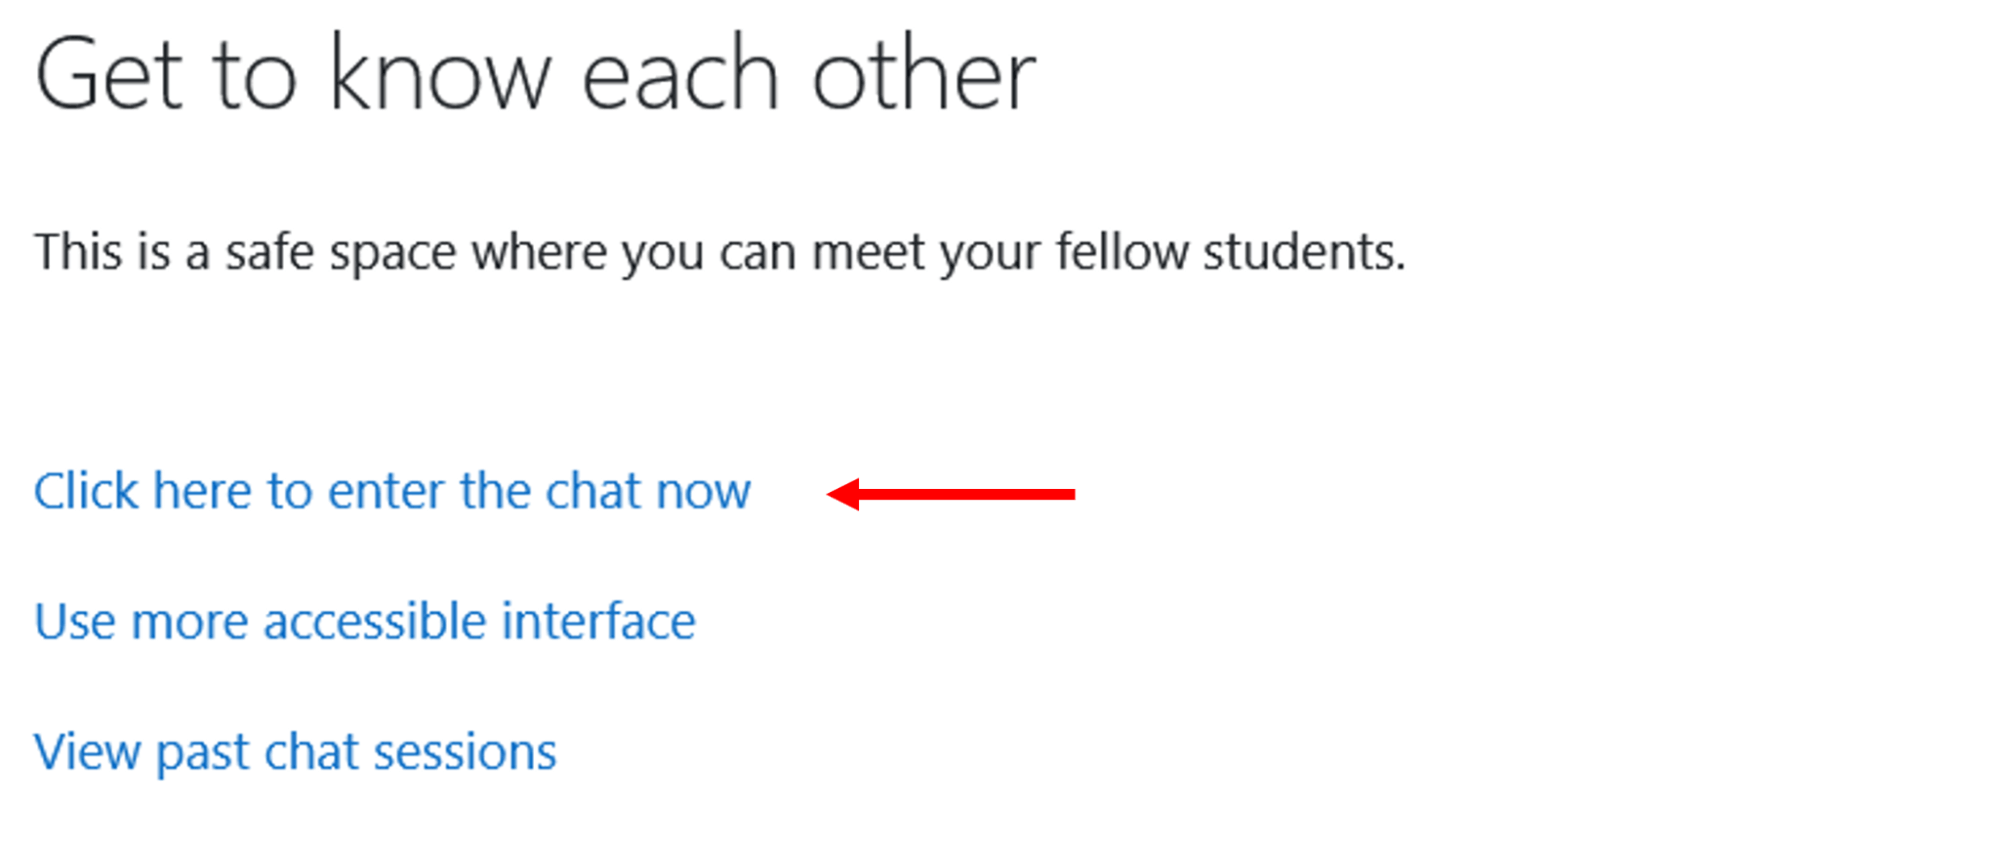
Image 15: Enter the chat
Image 15: Enter the chat
At this point you can start messaging as you would do with any text-based chat tool (Whatsapp, Facebook messenger, Telegram and others).
You can read more about messaging capabilities in the official messaging documentation.
Forum
Forums or discussion forums are generally used to communicate with a group of people, in this case with the course participants or with a subgroup of students working on a common task. They can be used as aggregators of ideas, opinions and spaces to enable further discussions about the course materials and updates.
There is one special type of forum called “Announcements” which gets created by default when you create a new course. It is not exactly a forum since it is a unidirectional communication tool used to publish course announcements (all the course participants are automatically subscribed to it but cannot reply to the announcements posts).

Image 16: Course announcements
Image 16: Course announcements
The standard forum is bidirectional, here course participants can discuss and add new topics. Teachers could also use this activity to evaluate the students participation and grade their posts.
For more insights and configuration options, watch the following video on the forum activity:
Handle content: Moodle editor, resources and activities
Moodle editor
Text content creation is done by the Moodle text editor called “Atto”. This WYSIWYG (What You See Is What You Get) editor allows users to write and format text based content. It also allows you to insert multimedia files (images, videos, etc.) without the necessity of writing HTML (behind the scenes, your content is being automatically translated to HTML).
This editor will appear anywhere the operation of text insertion/modification is allowed. For example, you can use it for describing Moodle resources and activities, inside quizzes and blocks.
By default, the text editor appears in its shorter format but you can expand it by clicking on the leftmost icon (number 1 on the image below):

Image 17: Moodle text editor, collapsed view. Source: https://docs.moodle.org/311/en/Atto_editor
, Licensed by GPLv3
Image 17: Moodle text editor, collapsed view. Source:
https://docs.moodle.org/311/en/Atto_editor
, Licensed byGPLv3
Text formatting buttons:
- Expand, show/hide a second row of buttons with additional functionalities, see the next image (Moodle text editor, expanded version)
- Style, let you select paragraph styles with various heading levels
- Bold text style
- Italic text style
Text alignments buttons:
- Bulleted list
- Numbered list
- Add link, inserts or modifies a hyperlink on the selected text/object
- Unlink, removes existing hyperlinks from the selected text/object
Advanced functionalities buttons:
- Add images
- Add emoticons (if enabled)
- Add media, insert or edit an audio/video file
- Record audio, live audio recording through your microphone (required)
- Record video, live video recording through your webcam (required)
- Manage embedded files
- H5P, allows to add H5P interactive content
Below you can find the expanded version of Moodle text editor:

Image 18: Moodle text editor, expanded view. Source: https://docs.moodle.org/311/en/Atto_editor
, Licensed by GPLv3
Image 18: Moodle text editor, expanded view. Source:
https://docs.moodle.org/311/en/Atto_editor
, Licensed byGPLv3
Text formatting buttons:
- Underline
- Strikethrough
- Subscript
- Superscript
Text alignments buttons:
- Align left/centre/right
- Decrease/increase indent
Advanced functionalities buttons:
- Equation editor, insert or edit equations
- Special characters, choose between a set of special characters
- Table, insert/modify tables
- Clear formatting, clears all the HTML code that might be associated within the selected text/object
- Undo/redo, the last performed actions
- Accessibility checker, verifies the accessibility of text with alerts when some accessibility issues occur
- Screen Reader helper, helps text comprehension by highlighting styles, links and images
- HTML/code view, shows the produced HTML (final output)
Moodle editor automatically saves your progress (periodically) so if you forgot to save your recent edits you may still find your content saved in the editor.
Moodle also includes a more advanced text editor called TinyMCE, where you can write directly in HTML. You can read more about it in the documentation: TinyMCE editor.
Resources
Moodle resources are items that teachers use in order to support their educational goals. These items are static (meaning that they do not allow learners to interact with each other or the Moodle platform, see activities for interactive content) and can range from simple pdf files, links to entire books.
Types of resources in Moodle (according to the official documentation):
- Book: Multi-page resources with a book-like format
- File: A picture, a pdf document, a spreadsheet, a sound file, a video file
- Folder: For helping organize files and one folder may contain other folders
- IMS content package: Add static material from other sources in the standard IMS content package format
- Label: Can be a few displayed words or an image used to separate resources and activities in a topic section, or can be a lengthy description or instructions
- Page: The student sees a single, scrollable screen that a teacher creates with the HTML editor
- URL: You can send the student to any place they can reach on their web browser, for example Wikipedia
These are standard resources included within most basic Moodle installations. There are also thousands of free plugins available at https://moodle.org/plugins, which system administrators can install to extend Moodle functionalities.
Activities
Activities are tools/spaces where learners can interact with other learners or teachers.
There are different types of activities in the standard Moodle that can be found when the edit mode is turned on and the link 'Add an activity or resource' is clicked:
- Assignments: Enable teachers to grade and give comments on uploaded files and assignments created online and offline
- Chat: Allows participants to have a real-time synchronous discussion
- Choice: A teacher asks a question and specifies a choice of multiple responses
- Database: Enables participants to create, maintain and search a bank of record entries
- Feedback: For creating and conducting surveys to collect feedback.
- Forum: Allows participants to have asynchronous discussions
- Glossary: Enables participants to create and maintain a list of definitions, like a dictionary
- H5P activity: Enables H5P content created in the Content bank or on h5p.com to be easily added to a course as an activity.
- Lesson: For delivering content in flexible ways
- (LTI) External tool: Allows participants to interact with LTI compliant learning resources and activities on other web sites. (These must first be set up by an administrator on the site before being available in individual courses.)
- Quiz: Allows the teacher to design and set quiz tests, which may be automatically marked and feedback and/or to correct answers shown
- SCORM: Enables SCORM packages to be included as course content
- Survey: For gathering data from students to help teachers learn about their class and reflect on their own teaching
- Wiki: A collection of web pages that anyone can add to or edit
- Workshop: Enables peer assessment
These are standard activities included within most basic Moodle installations. There are thousands of free plugins available at https://moodle.org/plugins, which system administrators can install to extend Moodle functionalities.
How to add resources and activities?
All types of Moodle resources and activities can be added by entering the edit mode on your course. Then you will be able to click on the 'Add an activity or resource' link as explained below.
As a teacher enable the course editing option from your course homepage:
Image 19: Enter edit mode
Image 19: Enter edit mode
Scroll down to the section where you want to add new activity or resource and click on the “Add an activity or resource” link:
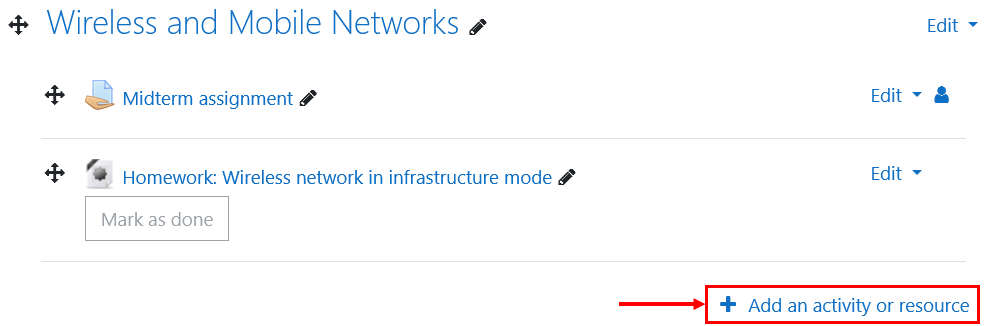
Image 20: Add an activity or resource
Image 20: Add an activity or resource
A new window will open letting you select the activity or resource to be added:
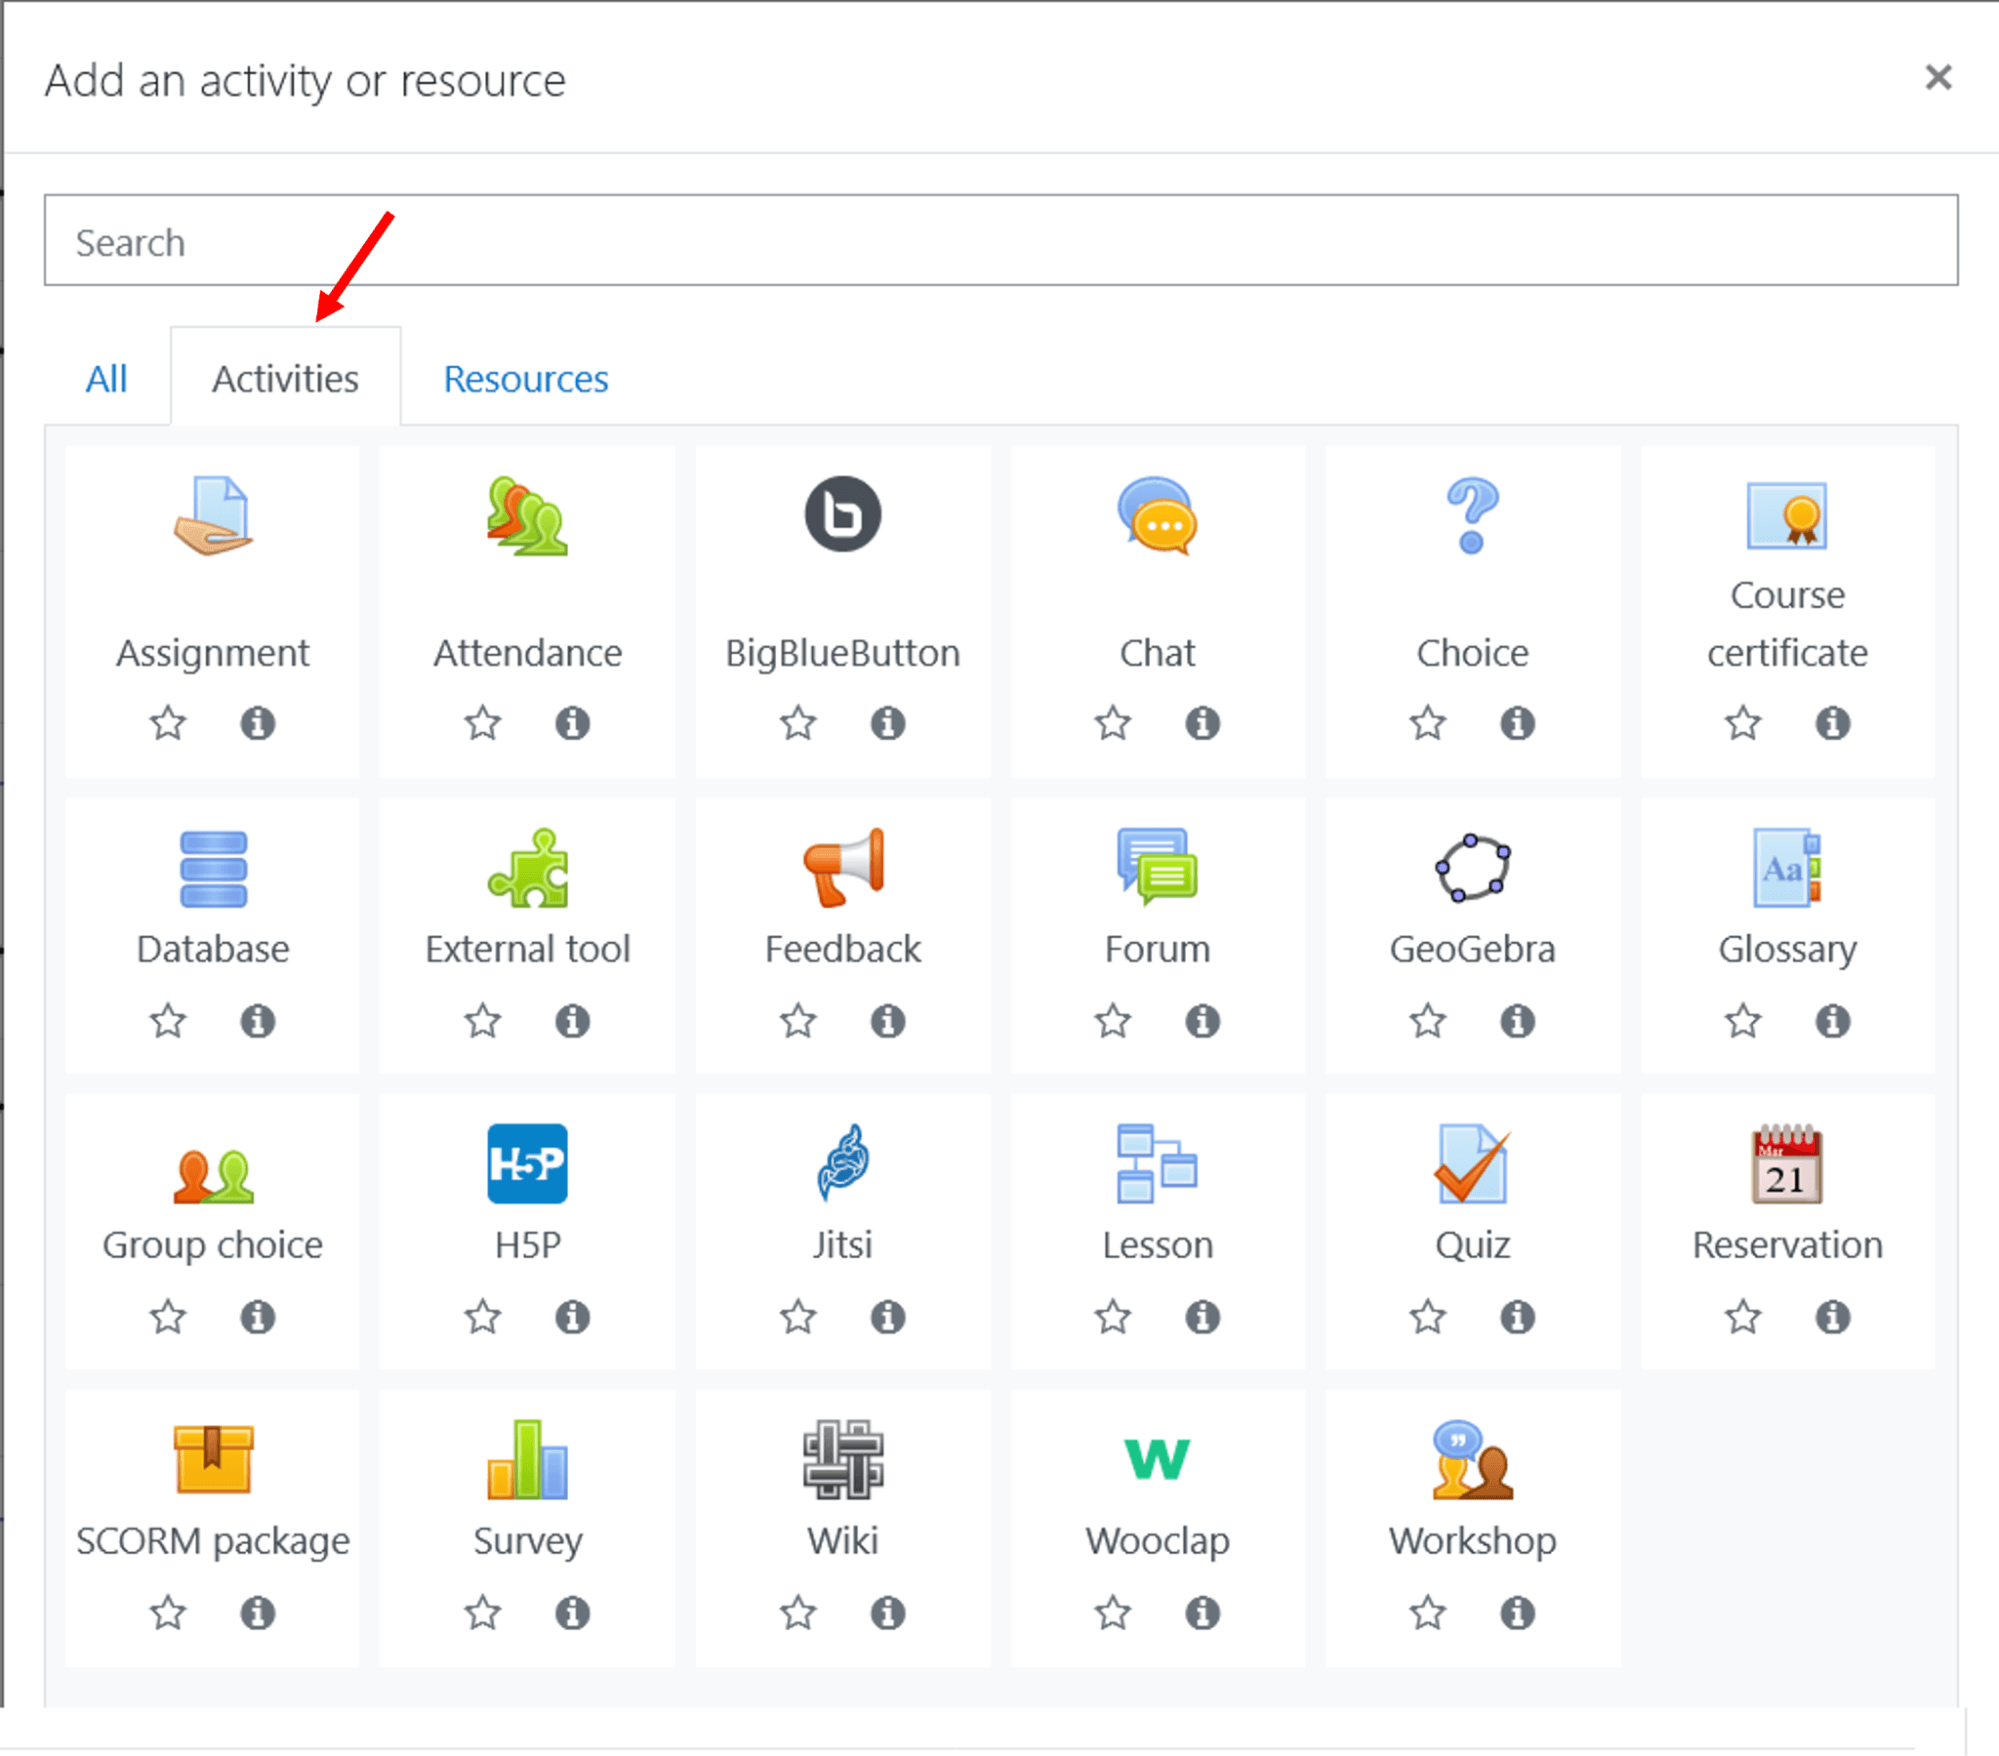
Image 21: Add an activity
Image 21: Add an activity
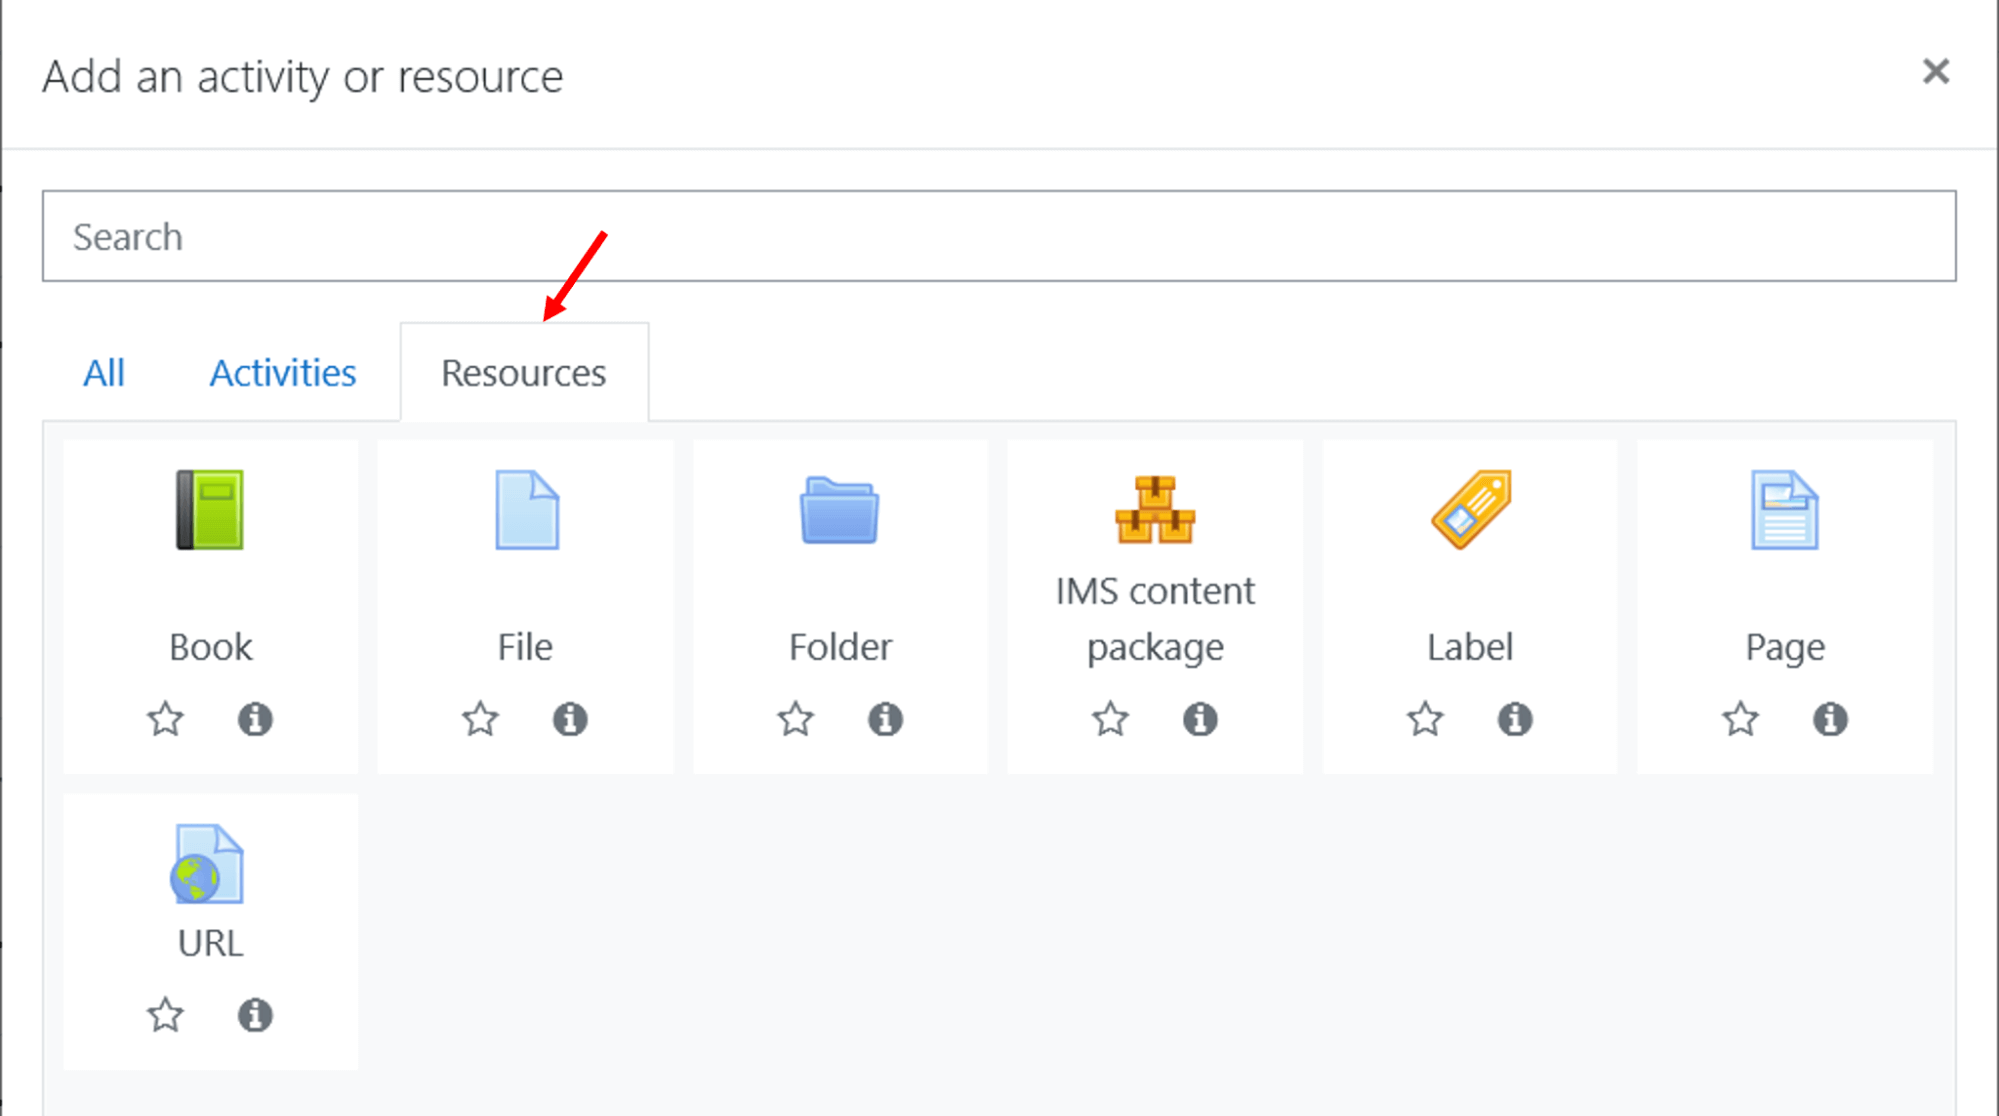
Image 22: Add a resource
Image 22: Add a resource
Choose and click over the activity or resource you want to add. Next, you will be asked to provide some configuration options for the specific content type you selected.
Each item has some specific options that you can select by following the on-screen instructions. Generally when you click over an activity or resource you will see the following page (it may vary slightly depending on the item you selected, this is an example of adding a File resource):
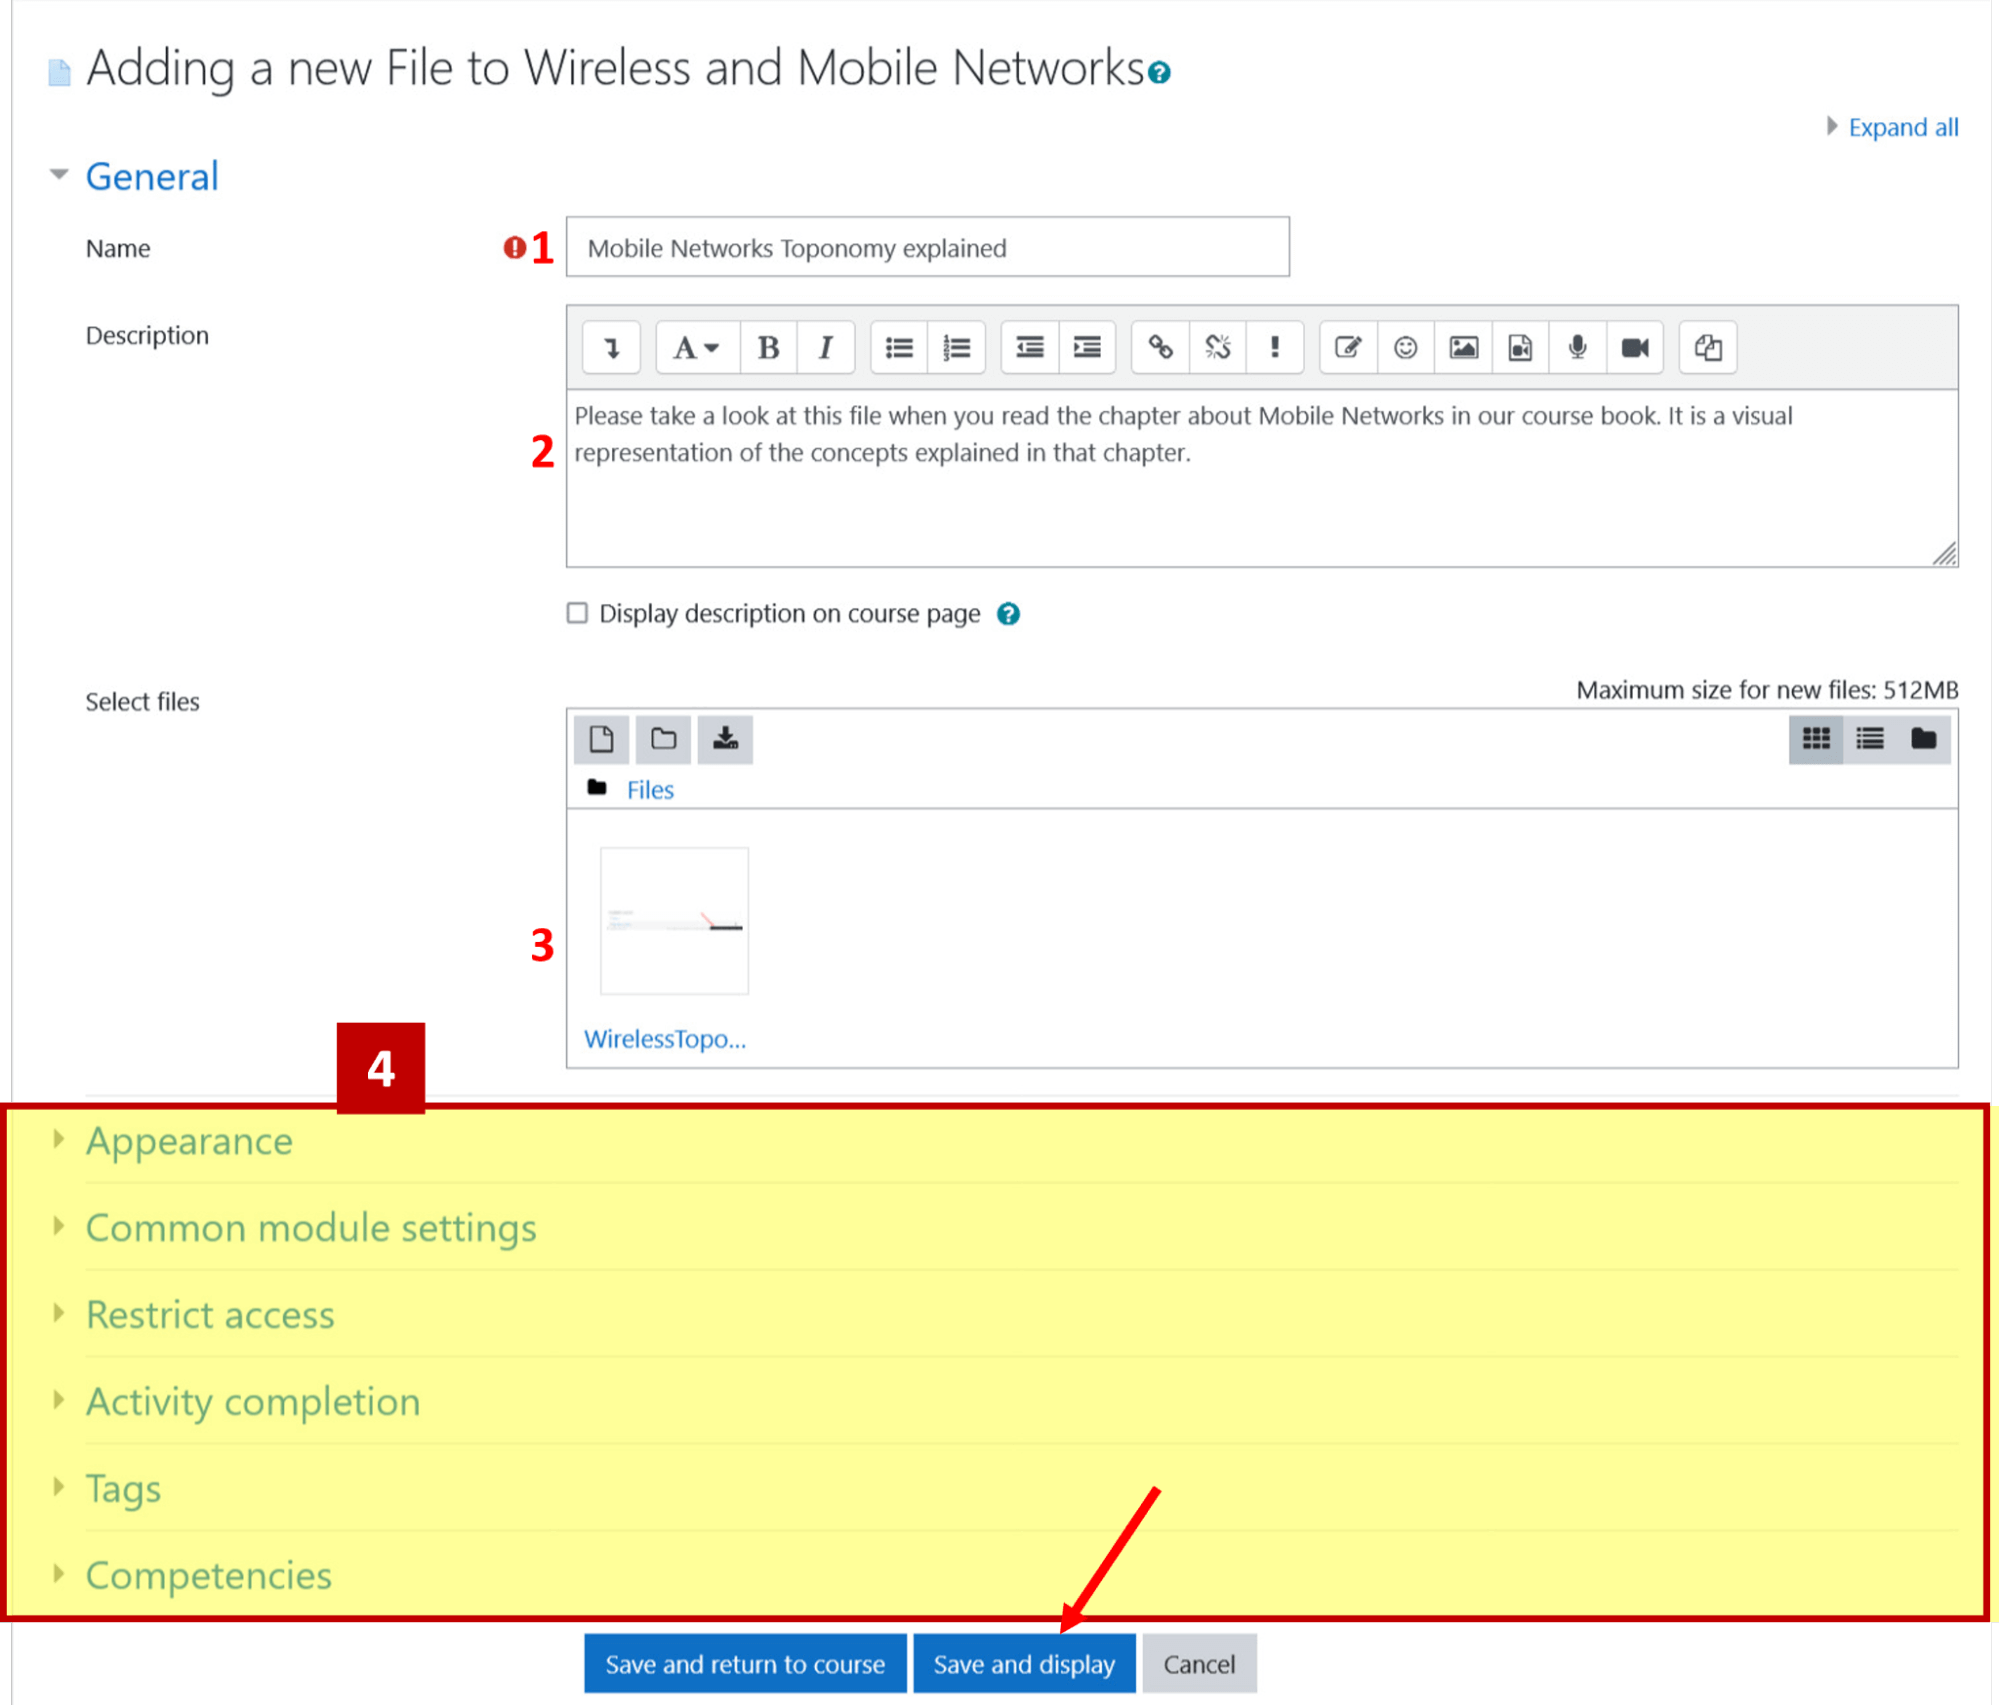
Image 23: Example of adding new resource (File)
Image 23: Example of adding new resource (File)
- File name (1) with the required flag
- File description (2), may be required depending on the site configuration
- Space to add files (3), you can use a file picker, but it can also support drag and drop
- File resource settings (4) contains some more advanced options for creating and sharing your content
Usually only a few options are required to proceed with the addition of new content. In this case we are required to add a name of our file resource and of course the file itself! Once you have configured all the desired options you can proceed by clicking the “Save and display” button to view the content directly in your course.
Collect information: choices, feedback
What is a Choice activity?
This is an activity which allows you to ask a question which can be answered by the course participants. It is useful to make quick pools/surveys. Each choice activity consists of one question and a series of choices displayed as radio buttons.
This activity is particularly useful for:
- making quick surveys
- evaluate in real-time the students comprehension of particular topics
- make decisions about group divisions and topics they would want to explore further
To add a choice, add an activity by selecting the Choice icon from the activity chooser.
Give it a name and a description and set other options depending on your use case.
Overview of the choice activity:
Below you can find a choice example where students are asked to be a part of one of the project groups (they can select only one option):
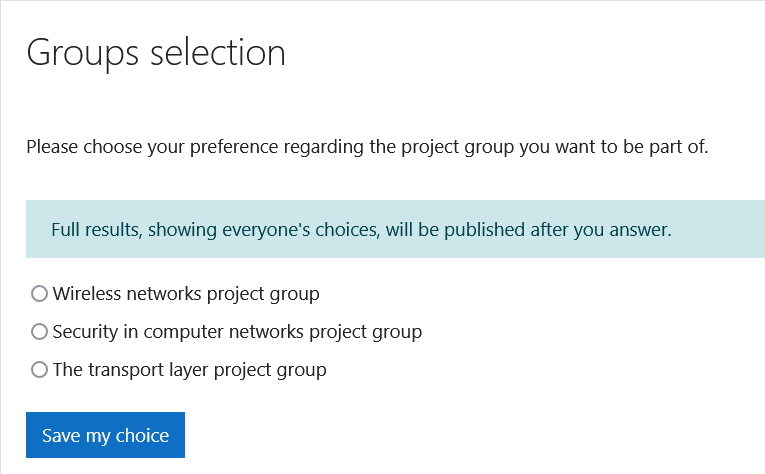
Image 24: example of choice activity
Image 24: example of choice activity
How to ask for feedback?
Feedback is a versatile activity often used to collect course and teacher evaluations. For example, you could collect student opinions to improve your teaching. After each lesson you could ask your students for feedback so you could adapt your strategy according to their responses.
Inside feedback, you can insert multiple choice questions, yes/no questions, open text questions and response-specific questions. The latter are dependent on previous responses, so they appear only if a specific option is selected during the feedback activity.
To add feedback, add an activity by selecting the Feedback icon from the activity chooser.
Give it a name and a description and set other options depending on your use case.
Some of the more advanced settings allow you to:
- make feedback anonymous, so the responses cannot be traced back to users
- repeat the activity by allow to fill and send new feedbacks (this is always true if feedback is set to anonymous)
- receive notifications each time users complete the feedback activity
- set start and end date to make the activity available for completion only during certain periods.
Here you can learn more about the feedback activity including some of the most common settings:
Evaluate: assignments, quiz, question bank
Assignments
Assignments allow students to submit work to their teacher for grading. As a teacher you will use the Moodle text editor to create assignments, for this reason they may also include multimedia content. For example you could insert a video as a task and ask your students to write their opinions and test their comprehension through a series of questions.
Assignments may be given to everyone in your course, to a group or even to a single student.
Always remember to ask specifically what students are expected to submit, that is the format and the files you expect them to upload. You could also decide that your students should fill the assignment using the Moodle editor directly or that they should upload a specific file type.
To add an assignment, add an activity by selecting the Assignment icon from the activity chooser.
Give it a name and a description and set other options depending on your use case. You can see some common configuration option for assignments in the following video:
How to grade assignments
Once created and published students can submit assignments and you will be able to view and grade them.
There are three main ways of grading assignments
- You can assign grades directly from the submission page where you can also inspect all the submissions made by the course participants:
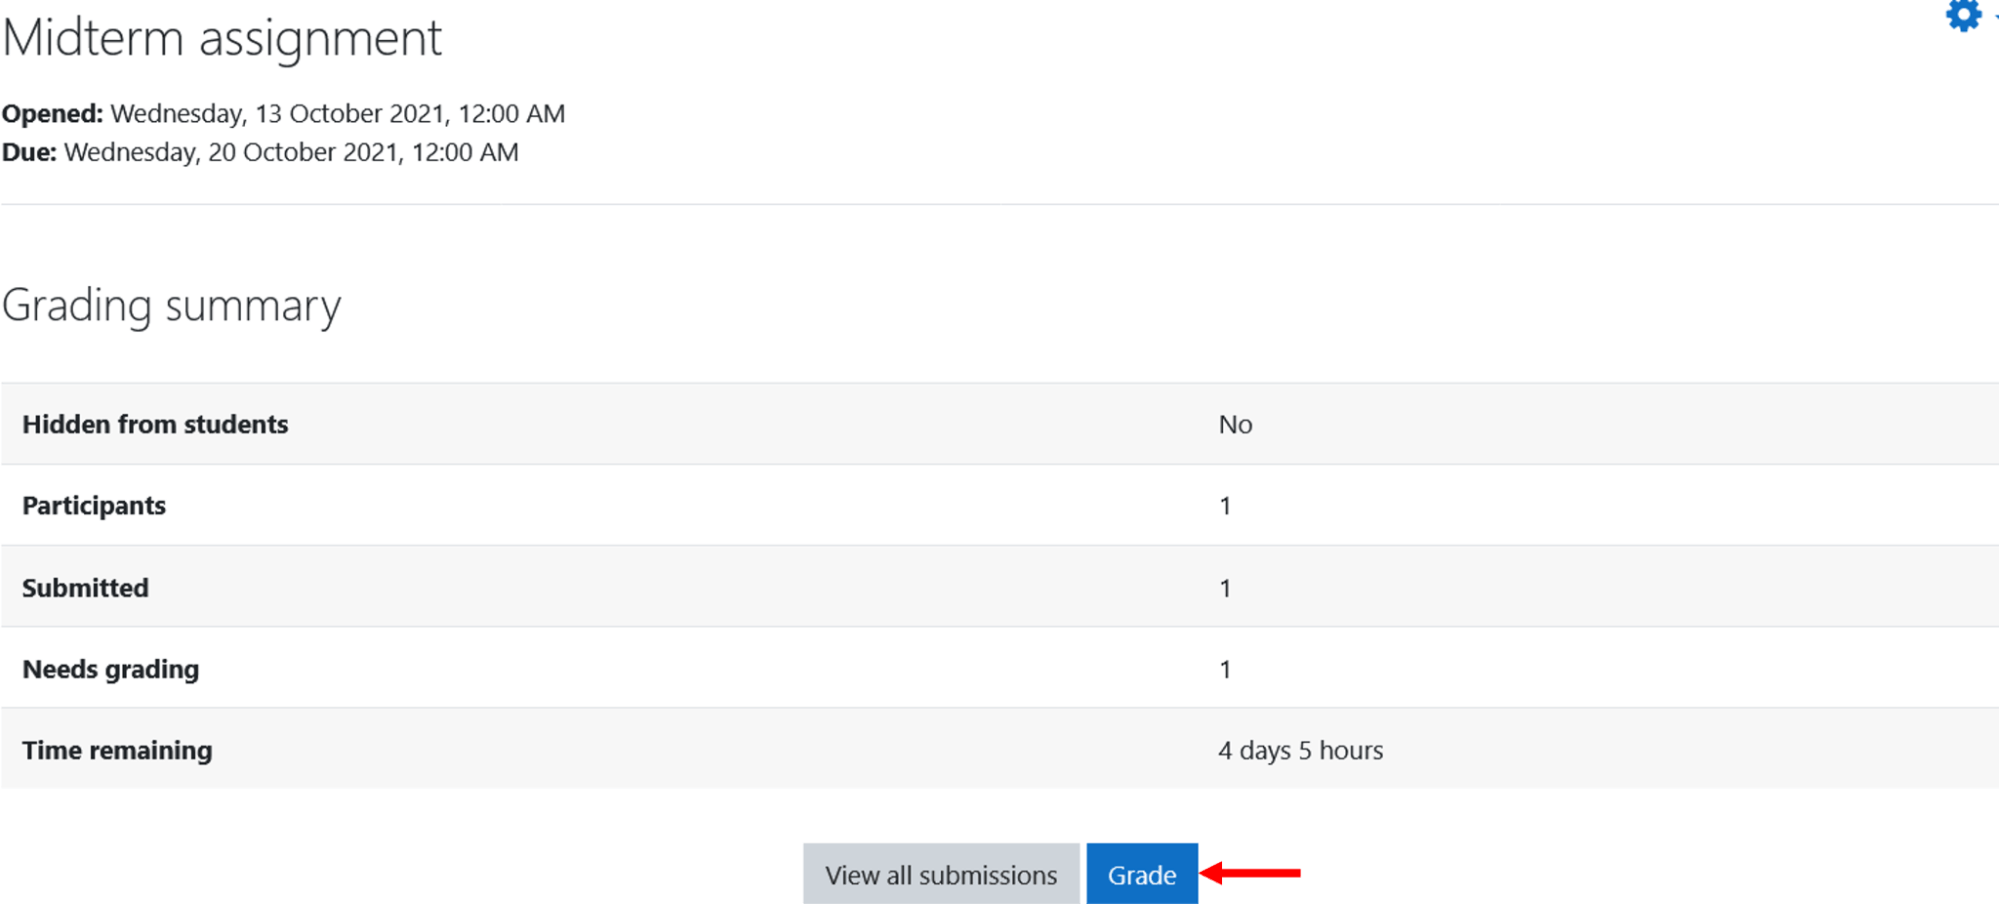
Image 25 Submission page overviewClick on the “Grade” button to view each single submission that has been made:
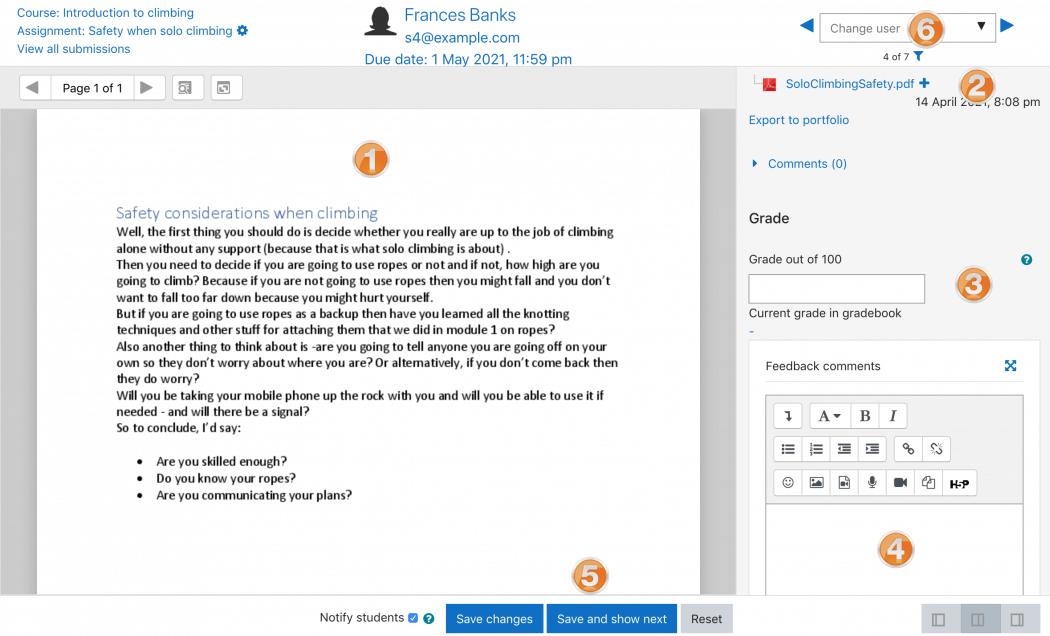
Image 26: Teacher submission view. Source:https://docs.moodle.org/311/en/Assignment_activity
, Licensed byGPLv3
- A space that shows the work that has been submitted (1), it can be annotated directly in Moodle
- File containing the submission (2), can be downloaded
- Grade input (3), here you can assign a grade to the assignment
- Individual feedback space (4), students will receive comments or observations that you write here
- Save and show next button (5), saves your work and shows the next submission
- You can also move back and forth between submissions with arrows (6)
Once the assignments are being graded, Moodle saves the results in the course gradebook.
- Grader report or gradebook, all the grades of each student in a course can be found in the course gradebook. It can be accessed from the Grade link in the navigation drawer.
You can learn more about the Grader report in the following video:
- Single view allows a course teacher to view either all the grades of one single student or a single grade item for all students. This view can be accessed by going to the Course homepage > Grades > Single view:
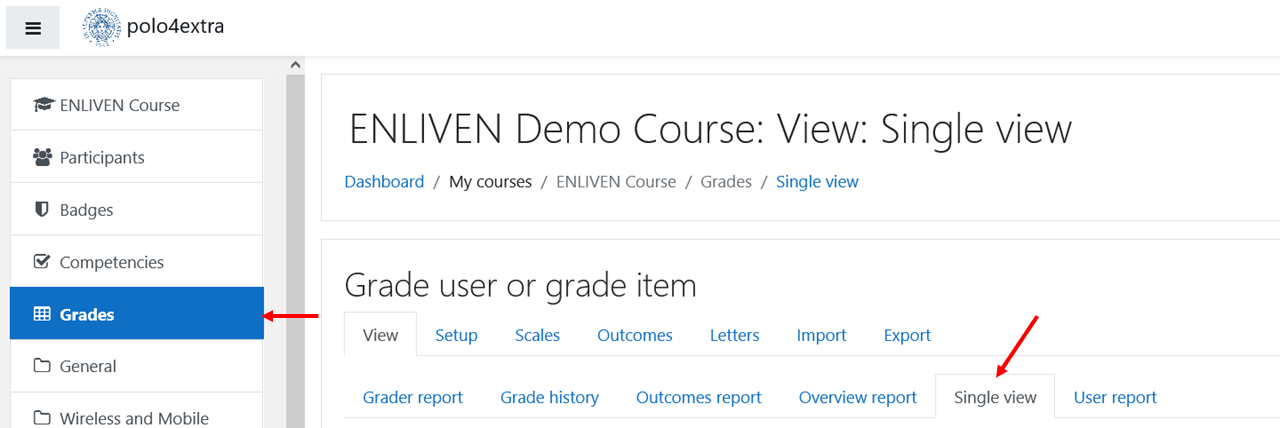
Image 27: Grades single view
Image 27: Grades single view
How to add a Quiz?
Quiz is a powerful activity with many configurable options. You can add multiple types of questions with embedded multimedia (images, links, videos etc.).
To add a quiz, add an activity by selecting the Quiz icon from the activity chooser.
Give it a name and a description and set other options depending on your use case.
Before you can proceed you have to select one of the following question types:
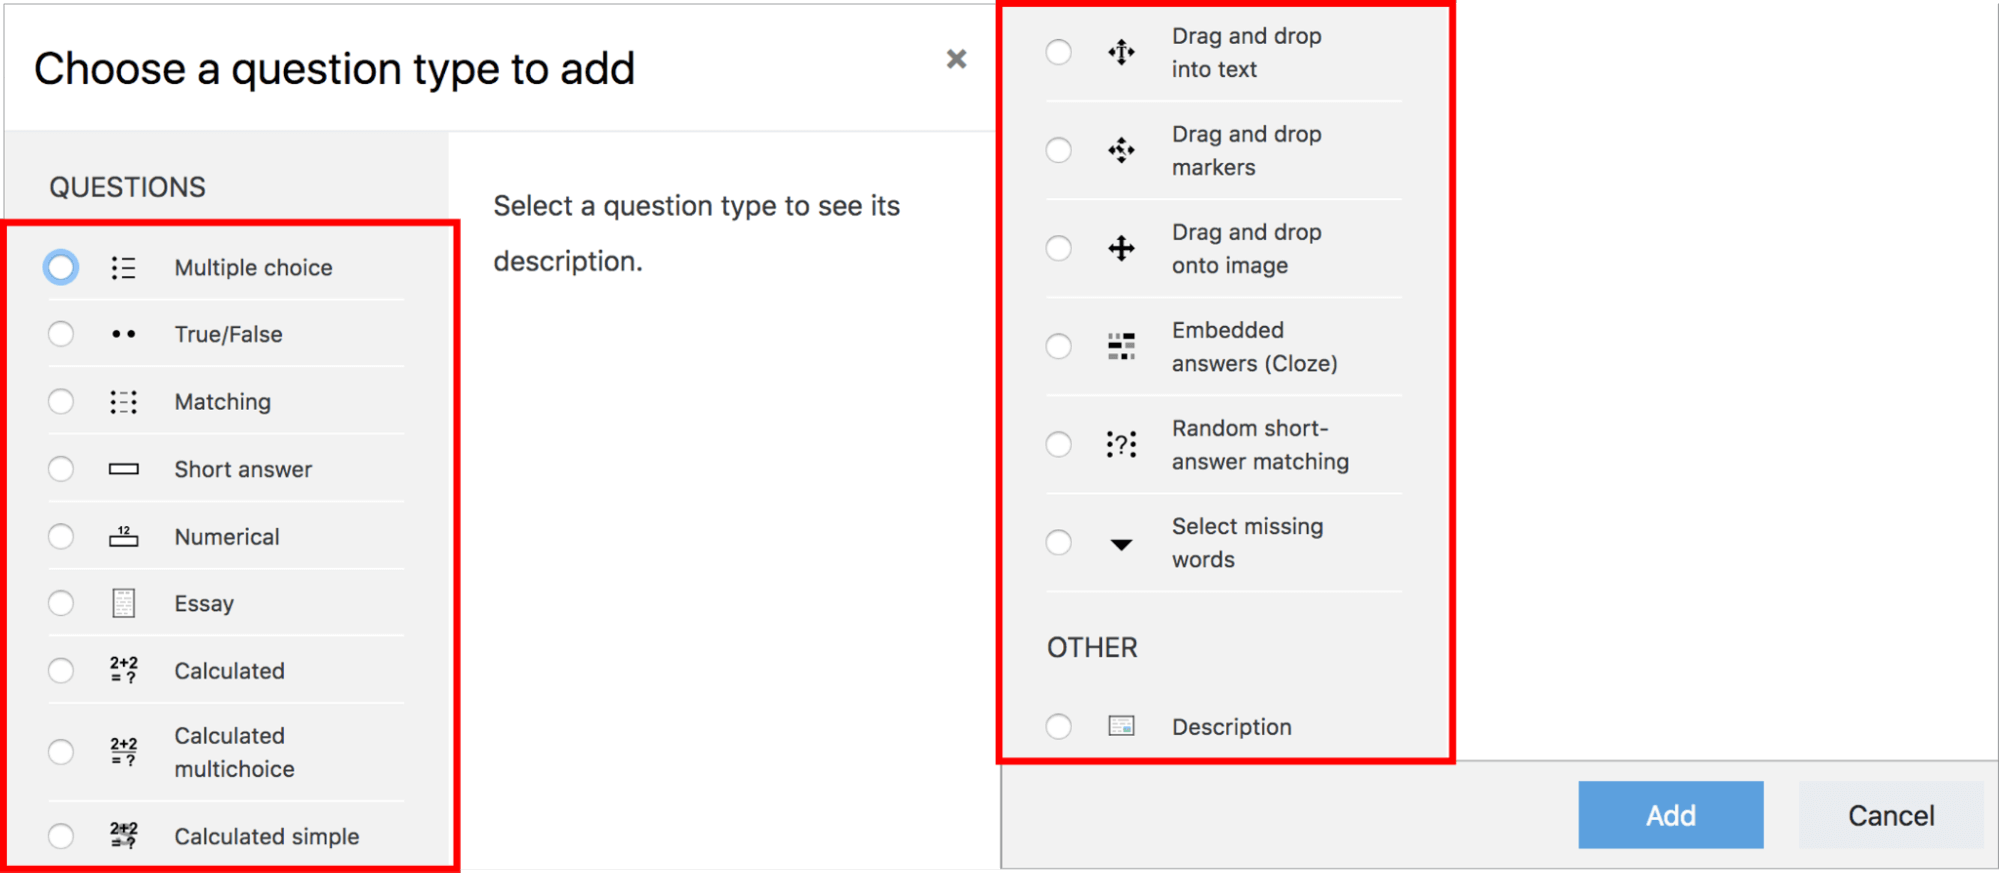
Image 28: Quiz question types
Image 28: Quiz question types
Once you select a question type, it is time to create the questions. The process of creation varies depending on your previous choice. When you create a new question it automatically gets saved in the Question bank so it can be reused in the future.
The Question bank is a place where all questions are stored. As a teacher you can create a database of questions, categorize them, view/edit and export them to create new quizzes.
This process and an overview about quizzes is better explained in the following video: